---
title: "Assign SitecoreAI roles with claims mapping"
slug: "assign-sitecoreai-roles-with-claims-mapping"
abstract: "Describes how to automatically assign SitecoreAI roles using claims from your identity provider."
---
# Assign SitecoreAI roles with claims mapping
By default, when a team member joins your organization and has a *User* role in a [SitecoreAI](https://doc.sitecore.com/sai/en/users/sitecoreai/sitecoreai.html) app, you need to manually [assign their roles in SitecoreAI](https://doc.sitecore.com/sai/en/developers/sitecoreai/user-security/users-roles-and-domains/add-a-user-to-a-role.html "Add a user to a role"). However, if your team members log in using SSO and have access to an [SitecoreAI](https://doc.sitecore.com/sai/en/users/sitecoreai/sitecoreai.html) app, you can automatically assign SitecoreAI roles using claims in your identity provider's (IdP) OIDC ID token or SAML response.
> [!important]
> Roles added through claims mapping are not visible in the Role Manager or User Manager.
To do this, configure your IdP to return additional claims and ensure they are assigned to the desired users. Next, in the Sitecore Cloud Portal, you'll need to map these additional claims to the Sitecore ID token. Finally, you'll need to map the Sitecore ID token claims to the SitecoreAI environment.
```mermaid
flowchart LR
subgraph Setup["Claims mapping setup"]
direction LR
C["Configure your IdP to include additional claims in the ID token or SAML response"]
D["Map IdP claims to Sitecore ID token"]
E["Map Sitecore ID token claims to SitecoreAI roles"]
C --> D --> E
end
subgraph Login["User login flow"]
direction LR
A["User logs in to SitecoreAI environment"]
B["Check Sitecore ID token for mapped claim"]
F["Assign SitecoreAI roles based on claim"]
A --> B --> F
end
style C fill:#ECECFE,stroke:#9370DB,color:#000000
style D fill:#ECECFE,stroke:#9370DB,color:#000000
style E fill:#ECECFE,stroke:#9370DB,color:#000000
style A fill:#ECECFE,stroke:#9370DB,color:#000000
style B fill:#ECECFE,stroke:#9370DB,color:#000000
style F fill:#ECECFE,stroke:#9370DB,color:#000000
linkStyle default stroke:#000000
```
This walkthrough describes how to:
1. Configure claims in your identity provider
2. Map IdP claims to the Sitecore ID token
3. Map Sitecore ID token claims to an environment
> [!note]
> **Before you begin**
> You need:
>
> - An *Organization Admin* or *Organization Owner* role in your Sitecore Cloud Portal organization.
>
> - The ability to edit claim configuration of your identity provider.
>
> - The ability to modify the SitecoreAI environment code repository where you want to automatically assign roles.
## Configure claims in your identity provider
In your identity provider, you must identify and add the claims you want to use to map SitecoreAI roles.
For example, if you want to assign roles using the `group` claim, you must configure your IdP to include the `group` claim in the ID token or SAML response. The claims returned by your IdP must be strings or arrays of strings.
You can learn how add claims in your preferred IdP by referring to the relevant documentation, such as:
- Okta OIDC
- Okta SAML
- Microsoft Entra
If using OpenID Connect, you might need to add more scopes to the **Scopes** field, so that the configured claims are returned by your IdP.
## Map IdP claims to the Sitecore ID token
After configuring the claims in your IdP, you need to map them to your users' Sitecore ID token.
If your IdP returns a claim that matches the name and regex pattern of a source claim, then the corresponding target claims will be added to the Sitecore ID token.
To map IdP claims to the Sitecore ID token:
> [!note]
> **XM Cloud is now SitecoreAI**
> Some code examples, images, and UI labels may still use XM Cloud while engineering assets are being updated.
1. Navigate to the Sitecore Cloud Portal SSO page, then find the connection where you want to map claims and click **Configure**.
2. On the connection configuration page, click **Claims mapping**.
3. In the **Claims mapping** dialog, click **Add claims mapping**.
4. In the **Source claims** section, in the **Name** field, enter the claim from your IdP that you want to map.
In the **Value** field, enter a regex pattern (ECMAScript syntax) to match the value returned by the IdP claim.
> [!note]
> Literal notation for regex is not supported.
>
> If you need case-insensitive regex, use the `i` [modifier](https://developer.mozilla.org/en-US/docs/Web/JavaScript/Reference/Regular_expressions/Modifier).
5. In the **Target claims** section, in the **Name** field, enter a name for the claim that will be added to the Sitecore ID token when a matching source claim is present in the IdP's ID token or SAML response.
6. In the **Value** field, enter the SitecoreAI app role you want to assign to users that have a claim that matches the name and regex pattern of a source claim. To see the available roles, use the [Role Manager](https://doc.sitecore.com/sai/en/developers/sitecoreai/user-security/users-roles-and-domains/create-and-set-up-a-role.html "Create and set up a role").
> [!note]
> When a mapped claim is added to a Sitecore ID token and Sitecore access token, it is automatically prefixed with the ID of the SSO connection. For example, if your target claim name is `xmc_role`, and the SSO connection ID is `con_Veryg0od1D123456`, then the claim name in the Sitecore ID token and Sitecore access token will be `con_Veryg0od1D123456.xmc_role`.
7. To add more target claims, click **Add target claim**. If you add multiple target claims to a mapping, all of them will be added as a single claim in the Sitecore ID token.
8. To add additional claims mappings, click **Add claims mapping**, then repeat steps 4 - 7. You can have up to 20 claims mappings per SSO connection.
9. When you've mapped the desired claims, click **Save**.
> [!important]
> A user can only map one claim per token exchange, but can have multiple target claim values from different mappings if the target claim name is the same, ([see User E in the claims mapping example](https://doc.sitecore.com/portal/en/developers/sitecore-cloud-portal/en/claims-mapping.html#UUID-d9b2b0a3-ec36-5595-ebea-873921d151db_section-idm234657633806521)). If multiple claims are mapped, a warning message will appear at login, and claims mapping will fail, ([see User D in the claims mapping example](https://doc.sitecore.com/portal/en/developers/sitecore-cloud-portal/en/claims-mapping.html#UUID-d9b2b0a3-ec36-5595-ebea-873921d151db_section-idm234657633806521)).
To verify that a mapped claim was added to the Sitecore ID token and Sitecore access token, [check the claims of a user](https://doc.sitecore.com/portal/en/developers/sitecore-cloud-portal/en/check-the-mapped-claims-of-your-account.html).
## Map Sitecore ID token claims to SitecoreAI roles
After mapping your IdP's claims to the Sitecore ID token, you need to create a `config` file to map the Sitecore ID token claims to roles in your SitecoreAI environment.
To create and deploy the config file to your SitecoreAI environment:
1. Create a `config` file, for example, `CustomClaims.config` and add the following code:
```xml
```
2. To map the target claims you created in the Cloud Portal, add `claim` elements to the `sources` sections using the following format:
``
- `CONNECTION_ID` - the ID of the SSO connection where you are configuring claims mapping.
- `TARGET_CLAIM_NAME` - the name of the target claim you defined in the Sitecore Cloud Portal.
In the target claims example, you would add the following `claim` element in the `sources` section of each identity provider:
```
```
> [!note]
> You must add the same claims to both identity providers (`Auth0` and `Bearer`), or users might encounter access issues.
3. Save the file and add it to your SitecoreAI environment repository in the `authoring/platform/App_Config/Include/zzz` folder, then rebuild and redeploy the environment.
> [!note]
> Configuration files in the `Include` folder are patched alphabetically, so putting a custom configuration file in the `Include/zzz` folder ensures that the file is patched last and not overwritten.
When the deployment is finished, you can log in to SitecoreAI to test your claims mappings.
## Claims mapping for SitecoreAI roles example
The following is an example of setting up claims mapping for an SitecoreAI environment. In this example, the SSO connection ID is `con_Veryg0od1D123456`
After you complete this example:
- All users will have the custom role `Sitecore\Default User`.
- Campaign managers will also have the custom roles `Sitecore\Campaign Manager` and `Sitecore\Analytics Reader`.
- Developers will also have the `Sitecore\Developer` role.
- When a user logs in to the SitecoreAI app with a mapped claim, their user profile will include the following comment: `User might have roles assigned via claims mapping`

### Configuring claims in your identity provider
Configure your external IdP to return the `group` claim with the value based on the following:
- If the user is a campaign manager, return the claim value `campaign_manager`.
- If the user is a developer, return the claim value `developer`.
### Mapping IdP claims to the Sitecore ID token
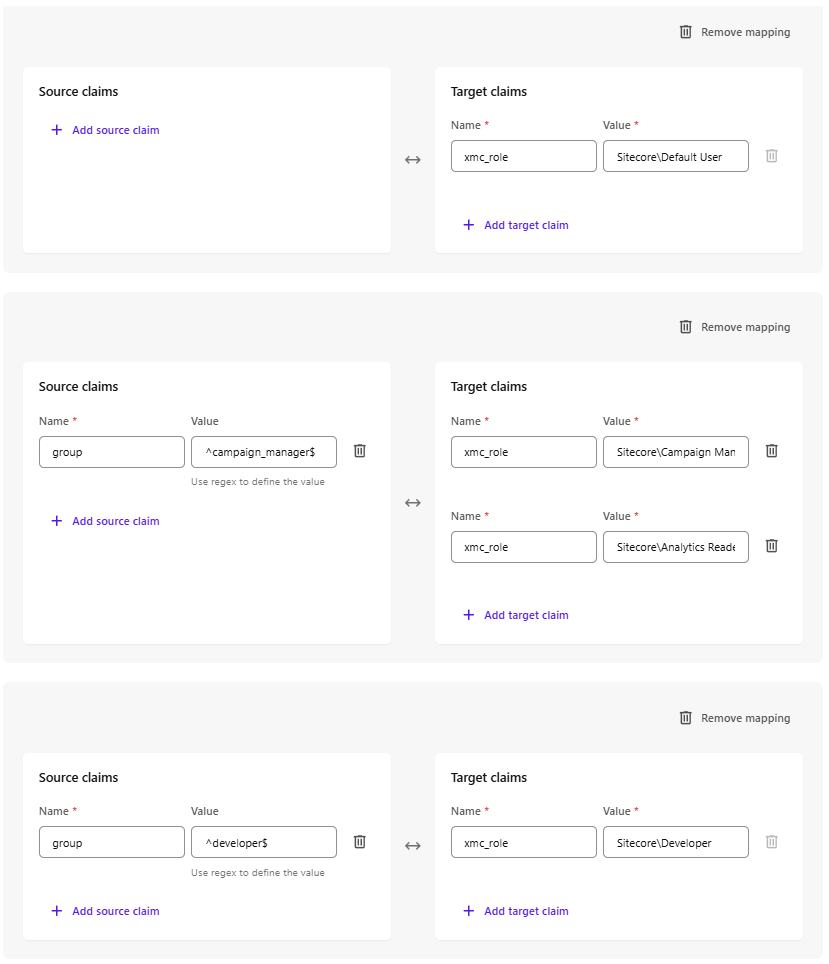
Edit the SSO connection and add the following claims mappings:
#### Claims mapping for default user
Source claim: N/A
ITarget claim:
- Name: `xmc_role`
- Value: `Sitecore\Default User`
Explanation: Because the *claims mapping* doesn't include a source claim, all users will have the claim `"con_Veryg0od1D123456.xmc_role": "Sitecore\Default User"` added to their Sitecore ID token and Sitecore access token when they log in.
> [!note]
> **XM Cloud is now SitecoreAI**
> Some code examples, images, and UI labels may still use XM Cloud while engineering assets are being updated.
#### Claims mapping for campaign manager
Source claim:
- Name: `group`
- Value: `^campaign_manager$`
Target claim #1:
- Name: `xmc_role`
- Value: `Sitecore\Campaign Manager`
Target claim #2:
- Name: `xmc_role`
- Value: `Sitecore\Analytics Reader`
> [!note]
> **XM Cloud is now SitecoreAI**
> Some code examples, images, and UI labels may still use XM Cloud while engineering assets are being updated.
Explanation: When a user logs in and their IdP's ID token or SAML response includes the `group` claim with value `campaign_manager`, then the claim `"con_Veryg0od1D123456.xmc_role": ["Sitecore\Default User", "Sitecore\Campaign Manager", "Sitecore\Analytics Reader"]` is added to their Sitecore ID token and Sitecore access token.
#### Claims mapping for developer
Source claim:
- Name: `group`
- Value: `^developer$`
Target claim:
- Name: `xmc_role`
- Value: `Sitecore\Developer`
> [!note]
> **XM Cloud is now SitecoreAI**
> Some code examples, images, and UI labels may still use XM Cloud while engineering assets are being updated.
Explanation: When a user logs in and their IdP's ID token or SAML response includes the `group` claim with value `developer`, then the claim `"con_Veryg0od1D123456.xmc_role": ["Sitecore\Default User", "Sitecore\Developer"]` is added to their Sitecore ID token and Sitecore access token.
### Mapping Sitecore ID token claims to SitecoreAI roles
Roles added through claims mapping are not visible in the Role Manager or User Manager. However, you can add a comment to mapped users to say that they have roles added through claims mapping.
Create the `config` file using the following code and deploy it to your environment:
```
truetrue
```
## Mark a user as administrator when logging in via SSO Claims Mapping
To mark a user as admin using claims mapping, add the following transformation to both the Auth0 and Bearer identity providers in the Sitecore config:
```
```
In addition, add the mapping to the SSO connection in the Cloud Portal.
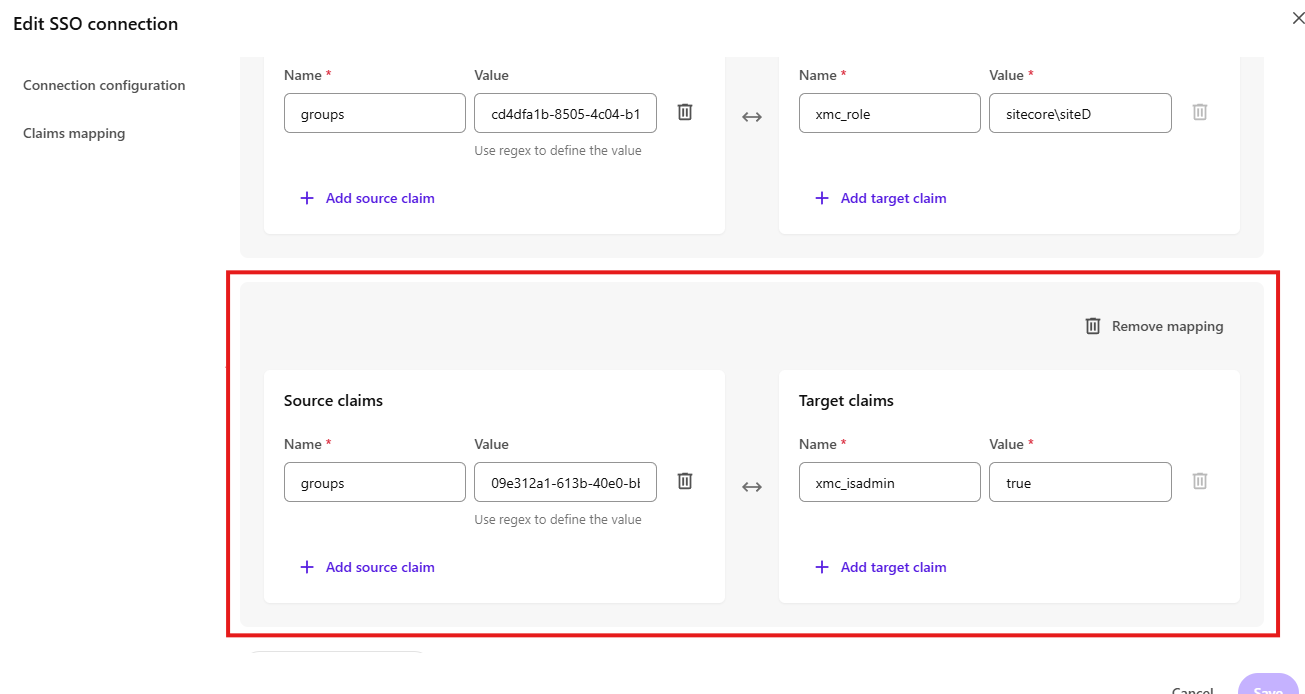
To mark a user as admin using claims mapping:
1. Navigate to the Sitecore Cloud Portal SSO page, then find the connection where you want to map claims and click **Configure**.
2. In the right-hand panel, click **Claims mapping**, then click **Add claims mapping**.
3. In **Source claims**, click **Add a souce claim**, then enter the requested data:
- Name: enter the claim from your IdP that you want to map.
- Value: enter a regex pattern (ECMAScript syntax) to match the value returned by the IdP claim.
4. In **Target claims**, enter:
- Name: `xmc_isadmin`
- Value: `true`
5. Click **Save**.