---
title: "Walkthrough: Create a submit action that redacts form submissions"
slug: "walkthrough--create-a-submit-action-that-redacts-form-submissions"
abstract: "Learn how to anonymize database records of users' personal information."
---
# Walkthrough: Create a submit action that redacts form submissions
The right to erasure (also known as the right to be forgotten) concerns a users's right for personal data to be deleted. This topic describes how to use Sitecore Forms to remove users' personal information from submitted forms.
> [!warning]
> This topic describes how to configure your Sitecore Forms implementation to support data privacy compliance. This topic is not exhaustive and it should not be construed or used as legal advice about the content, interpretation, or application of any law or regulation.
To facilitate Sitecore and their partners in complying with data privacy obligations, Sitecore Forms provides an API to anonymize database records of users' personal information. It accomplishes this by masking all field submission values to `~REDACTED~`, nullifying the contact IDs, and deleting any files uploaded by the contact.
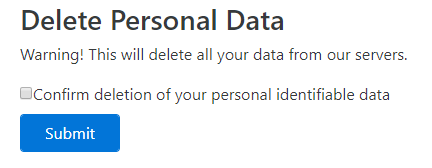
This walkthrough describes how to create a custom submit action that redacts form submissions and removes files uploaded by a specific contact. The scenario used in this topic describes how to display a consent check box that visitors can tick to finalize the redaction of their personal data. When the visitor selects the box and clicks **Submit**, redaction occurs. All the visitor's submissions will be redacted and all files uploaded by the visitor will be removed.
> [!important]
> In this scenario, the contact is obtained through Sitecore Analytics. Therefore, redaction is not executed in CMS-only mode. Sitecore Forms creates the redact data provider through dependency injection, therefore you can override its implementation using configuration files.
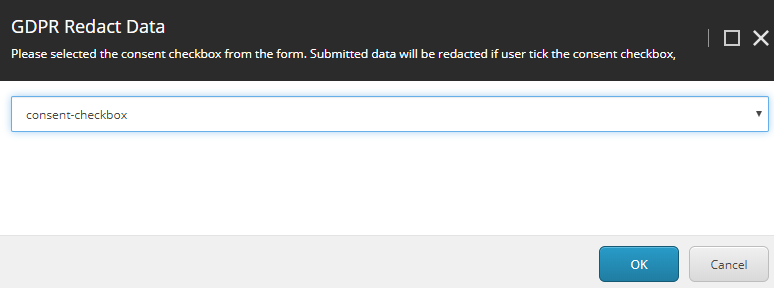
The client script used in this walkthrough lets the form designer use a checkbox element as the consent check box. For example:
This walkthrough describes how to:
- [Create a submit action class](https://doc.sitecore.com/xp/en/developers/102/sitecore-experience-manager/walkthrough--create-a-submit-action-that-redacts-form-submissions.html#UUID-c30e2bd4-cd2b-c7b2-1fdf-ee492a3a4c01_section-idm4545042516198431569498435271 "Create a submit action class")
- [Create the SPEAK editor control](https://doc.sitecore.com/xp/en/developers/102/sitecore-experience-manager/walkthrough--create-a-submit-action-that-redacts-form-submissions.html#UUID-c30e2bd4-cd2b-c7b2-1fdf-ee492a3a4c01_section-idm4479625702486431650732645936 "Create the SPEAK editor control")
- [Add a folder that contains parameters for the editor](https://doc.sitecore.com/xp/en/developers/102/sitecore-experience-manager/walkthrough--create-a-submit-action-that-redacts-form-submissions.html#UUID-c30e2bd4-cd2b-c7b2-1fdf-ee492a3a4c01_section-idm4573163340129631650747995221 "Add a folder that contains parameters for the editor")
- [Create the client script for the editor](https://doc.sitecore.com/xp/en/developers/102/sitecore-experience-manager/walkthrough--create-a-submit-action-that-redacts-form-submissions.html#UUID-c30e2bd4-cd2b-c7b2-1fdf-ee492a3a4c01_section-idm4480052143929631569540511718 "Create the client script for the editor")
- [Create the submit action item](https://doc.sitecore.com/xp/en/developers/102/sitecore-experience-manager/walkthrough--create-a-submit-action-that-redacts-form-submissions.html#UUID-c30e2bd4-cd2b-c7b2-1fdf-ee492a3a4c01_section-idm4646117388305631650767653446 "Create the submit action item")
Create a submit action class
When you create a custom submit action, you must create a class that inherits from the `SubmitActionBase` class.
To create the submit action class:
1. Create the `RedactData` class that inherits from `SubmitActionBase`.
2. Specify the `RedactData` parameter.
3. Override the Execute method and provide the boolean validation parameters. For example:
```csharp
using System;
using System.Linq;
using Microsoft.Extensions.DependencyInjection;
using Sitecore.Analytics;
using Sitecore.DependencyInjection;
using Sitecore.ExperienceForms.Data;
using Sitecore.ExperienceForms.Models;
using Sitecore.ExperienceForms.Mvc.Models.Fields;
using Sitecore.ExperienceForms.Processing;
using Sitecore.ExperienceForms.Processing.Actions;
namespace Sitecore.ExperienceForms.Gdpr.Samples.SubmitActions
{
public class RedactData : SubmitActionBase
{
private readonly IRedactDataProvider _redactDataProvider = ServiceLocator.ServiceProvider.GetService();
private readonly ITracker _tracker = Tracker.Current;
public RedactData(ISubmitActionData submitActionData) : base(submitActionData)
{
}
protected override bool Execute(RedactDataSubmitActionData data, FormSubmitContext formSubmitContext)
{
var consentCheckBox = formSubmitContext.Fields.FirstOrDefault(f => Guid.Parse(f.ItemId) == data.ConsentCheckboxFieldId);
if (consentCheckBox is CheckBoxViewModel checkboxVm)
{
if (checkboxVm.Value)
{
var contactId = _tracker?.Contact?.ContactId;
if (contactId != null)
{
_redactDataProvider.RedactContactSubmissions(contactId.Value);
}
}
}
else
{
return false;
}
return true;
}
}
}
```
```csharp
using System;
namespace Sitecore.ExperienceForms.Gdpr.Samples.SubmitActions
{
public class RedactDataSubmitActionData
{
public Guid ConsentCheckboxFieldId { get; set; }
}
}
```
4. Build and deploy the submit action class.
Create the SPEAK editor control
The next step is to create the UI that enables mapping the form fields to the contact details fields. For Sitecore Forms, submit action editors are in the core database: `/sitecore/client/Applications/FormsBuilder/Components/Layouts/Actions`
> [!note]
> In this example, you must have the Sitecore Rocks Visual Studio plugin. The plugin is compatible with Visual Studio 2019 or earlier.
To create the control:
1. Navigate to `/sitecore/client/Applications/FormsBuilder/Components/Layouts/Actions`.
2. Right-click **Actions**, click **Add**, and then click **New Item**.
3. Click the `/sitecore/client/Speak/Templates/Pages/Speak-BasePage` template, and in the **Enter the name of the new item** field, enter *RedactData* and click **OK**.
4. Right-click the *RedactData* item you just created and click **Tasks**, and click **Design Layout**.
5. In the **Layout** dialog box, navigate to `/sitecore/client/Speak/Layouts/Layouts` and click the *Speak-FlexLayout* layout and click **OK**.
6. In the upper-left corner, click **Add Rendering** and in the **Select Renderings** dialog box, click **All** and search for *PageCode*:
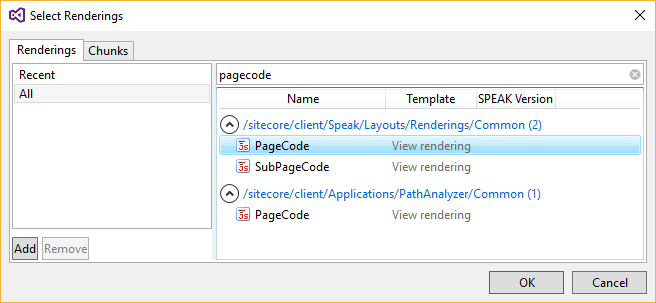
7. Click `PageCode` and click **OK**.
8. In the `PageCode` rendering properties, set the `PageCodeScriptFileName` property to the JavaScript path that contains the page code script: `/sitecore/shell/client/Applications/FormsBuilder/Layouts/Actions/RedactData.js`.
9. Set the `SpeakCoreVersion` property to *Speak 2-x*.
10. Search for and select the `Text View` rendering and click **Add** to add: `HeaderTitle`, and `HeaderSubtitle`.
11. For the two items, in the **Properties** section, set the following ID properties:
- `IsVisible` – *False*
- `PlaceholderKey` – *Page.Body*
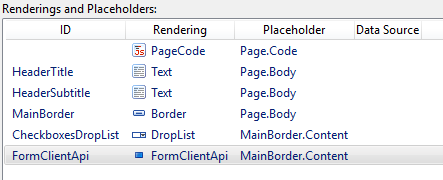
12. Add the following renderings:
- `MainBorder` of type *Border*.
- `CheckboxesDropList` of type *DropList*. Set the `PlaceholderKey` property to *MainBorder.Content*.
- `FormClientApi` of type *FormClientApi*. Set the `PlaceholderKey` property to *MainBorder.Content*.
Your rendering now looks like this:
Add a folder that contains parameters for the editor
Next, you must add a folder that contains the parameters for the editor.
To add the `PageSettings` folder:
1. Navigate to `/sitecore/client/Applications/FormsBuilder/Components/Layouts/Actions`, and right-click the *RedactData* item you created earlier, click **Add**, and click **New item**.
2. Search for and select the *PageSettings* template, enter the name *PageSettings* and click **OK**.
3. Right-click the *PageSettings* item that you just created and click **Add**, **New Item**.
4. Search for and select the *Text Parameters* template, click **Add** twice, and name the items identically to the IDs in the layout you created previously:
- `HeaderTitle` – double-click and in the **Text field** enter: *GDPR Redact Data*.
- `HeaderSubtitle` – double-click and in the **Text field** enter: *To redact submitted data, select the consent check box.*
5. Right-click the `PageSettings` item again and click **Add**, **New Item**. Search for and click the *DropList Parameters* template and click **Add** and name the item *CheckboxesDropList*.
6. Double-click the `CheckboxesDropList` item and set the following field values:
| CheckboxesDropList Parameter | ValueFieldName | DisplayFieldName |
| --- | --- | --- |
| CheckboxesDropList | itemId | name |
7. Right-click the `PageSettings` item again and click **Add**, **New Item**. Search for and click the *FormClientApi-Parameters* template and click **Add** and name the item *FormClientApi*.
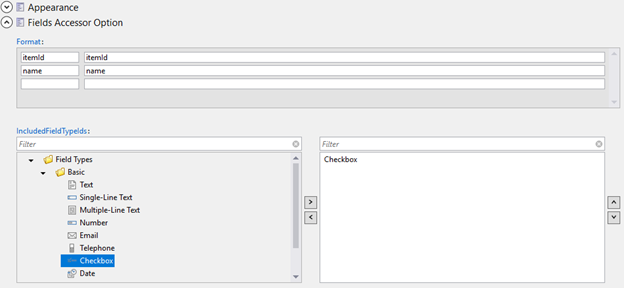
8. Double-click the `FormClientApi` item and on the **Format** field value table, add a binding between `itemId` and `itemId`, and another binding between `name` and `name`. In the **IncludedFieldTypeIds** field, find and click `Field Types/Basic/Checkbox` in the left list box, then click **\>** to copy it to the right list box.
9. Navigate to `/sitecore/client/Applications/FormsBuilder/Components/Layouts/Actions` and right-click the `PageSettings` item that you created earlier.
10. Add a new item named *Stylesheet* of type `Page-Stylesheet-File`:
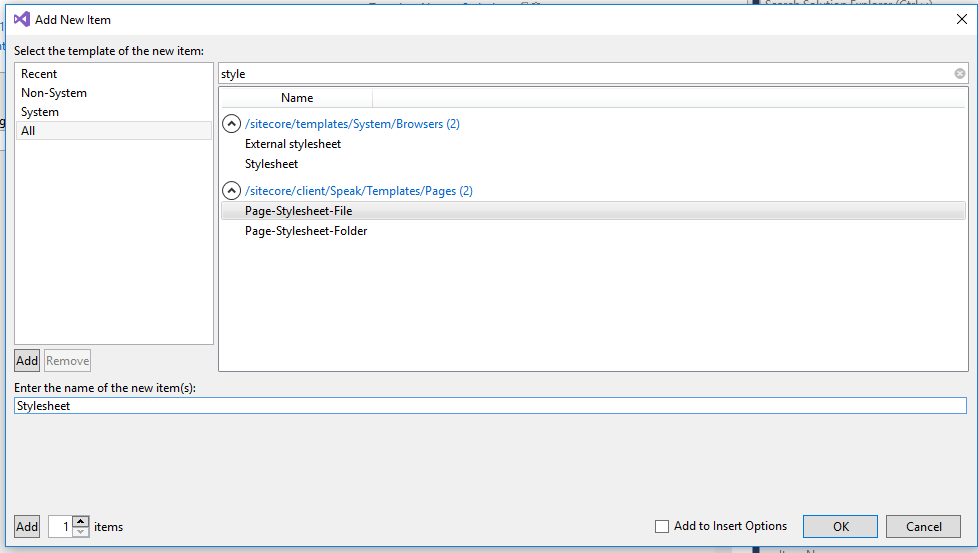
11. Click the new stylesheet item and set the **Stylesheet** value to: `/sitecore/shell/client/Applications/FormsBuilder/Layouts/Actions/Actions.css`.
Create the client script for the editor
Now you must create the client script for the editor.
To create the script:
1. Use the base Submit actions editor script. The Submit actions editor script always has the following base:
```csharp
(function (speak) {
var parentApp = window.parent.Sitecore.Speak.app.findApplication('EditActionSubAppRenderer');
speak.pageCode(["underscore"],
function (_) {
return {
initialized: function () {
this.on({
"loaded": this.loadDone
},
this);
if (parentApp) {
parentApp.loadDone(this, this.HeaderTitle.Text, this.HeaderSubtitle.Text);
parentApp.setSelectability(this, true);
}
},
loadDone: function (parameters) {
this.Parameters = parameters || {};
},
getData: function () {
return this.Parameters;
}
};
});
})(Sitecore.Speak);
```
2. Use the `EditActionSubAppRenderer` component. The editors are loaded in a frame in a Speak dialog by the `EditActionSubAppRenderer` component.
They must pass the dialog header title and subtitle to the parent, and set when the submit button is enabled.
The script works as follows:
- `initialized` – collects the data from the fields into an array.
- `loadDone` – iterates the form controls, and sets their dynamic data to the fields array. If the current submit action Parameters property value is not in the fields list (for example, if the field is deleted, or the form copied), it includes an ID value not in the selection list item in the array. Then it binds the SPEAK form to the Parameters object.
- `getData` – when the submit button is clicked, the getData function is called. It iterates the form data in order to collect the new Parameters object. Empty selections (field mappings) are omitted.
Your final script should look like this:
```csharp
(function (speak) {
var parentApp = window.parent.Sitecore.Speak.app.findApplication('EditActionSubAppRenderer');
speak.pageCode(["underscore"],
function (_) {
return {
initialized: function () {
this.on({
"loaded": this.loadDone
}, this);
this.Fields = this.FormClientApi.getFields();
this.CheckboxesDropList.Items = this.Fields;
if (parentApp) {
parentApp.loadDone(this, this.HeaderTitle.Text, this.HeaderSubtitle.Text);
parentApp.setSelectability(this, true);
}
},
loadDone: function (parameters) {
this.Parameters = parameters || {};
this.CheckboxesDropList.SelectedValue = this.Parameters.consentCheckboxFieldId;
},
getData: function () {
this.Parameters.consentCheckboxFieldId = this.CheckboxesDropList.SelectedValue;
return this.Parameters;
}
};
});
})(Sitecore.Speak);
```
Create the submit action item
To create the submit action item:
1. Navigate to */sitecore/system/Settings/Forms/Submit Actions*.
2. Right-click **Submit Actions**, click **Insert**, and click **Insert from template**.
3. In the `/System/Forms/Submit Action` template, in the **Item Name** field, enter the name *Redact Data* and click **Insert**.
4. Navigate to the item you just created and in the **Settings** section, in the **Model Type** field, set the value to the class type name.
5. In the **Error Message** field, enter an error message, for example, *Failed to redact data!*
6. In the **Editor** field, select the editor that you just created, for example, *RedactData*.
7. In the **Appearance** section, select the icon that you want to display in the Form elements pane.
In the Form elements pane, when you click **Add a submit action**, you can now click the **Redact Data** action.