---
title: "Walkthrough: Creating custom validation"
slug: "walkthrough--creating-custom-validation"
abstract: "Example of how to implement a custom validation that validates names."
---
# Walkthrough: Creating custom validation
A web form validation ensures a website visitor enters the correct value in a field on a web form. You can implement custom validation or create a new validator based on the existing validation. This walkthrough describes how to implement custom validation that verifies names. It validates the input string of the Single-line text field for valid names.
> [!note]
> This topic provides an example of how to create a custom validation, but to create a Name validator based on the regular expression, you do not have to create a custom validation. You can create a name validator by [reusing the existing RegularExpressionValidation](https://doc.sitecore.com/xp/en/developers/102/sitecore-experience-manager/walkthrough--creating-a-custom-validator-based-on-the-existing-regular-expression-validation.html "Walkthrough: Creating a custom validator based on the existing regular expression validation").
This walkthough describes how to:
- Create the validation class
- Create the validation item
- Modify the field type
- Add the validation to the field editor
Create the validation class
When you create a custom validation, you must create a class that inherits from the `ValidationElement`.
To create the validation class:
1. Create the `NameValidation`class and inherit from `ValidationElement`.
2. Reference the `Sitecore.ExperienceForms.Mvc` package and `System.ComponentModel.DataAnnotation` assembly.
3. Implement the `Validate`method for server validation.
4. Implement the `ClientValidationRules` property for client validation.
5. Override the Initialize method to initialize properties from the validated model (for example, the title of the field).
```csharp
using System.Collections.Generic;
using System.ComponentModel.DataAnnotations;
using System.Text.RegularExpressions;
using System.Web.Mvc;
using Sitecore.ExperienceForms.Mvc.Models.Fields;
using Sitecore.ExperienceForms.Mvc.Models.Validation;
namespace Sitecore.ExperienceForms.Samples.Validation
{
public class NameValidation : ValidationElement
{
private const string NamePattern = "^[a-zA-Z ]*$";
public NameValidation(ValidationDataModel validationItem) : base(validationItem)
{
}
public override IEnumerable ClientValidationRules
{
get
{
var clientValidationRule = new ModelClientValidationRule
{
ErrorMessage = FormatMessage(Title),
ValidationType = "regex"
};
clientValidationRule.ValidationParameters.Add("pattern", NamePattern);
yield return clientValidationRule;
}
}
public string Title { get; set; }
public override ValidationResult Validate(object value)
{
if (value == null)
{
return ValidationResult.Success;
}
var regex = new Regex(NamePattern, RegexOptions.IgnoreCase | RegexOptions.ExplicitCapture | RegexOptions.Compiled);
var stringValue = (string)value;
if (string.IsNullOrEmpty(stringValue) || regex.IsMatch(stringValue))
{
return ValidationResult.Success;
}
return new ValidationResult(FormatMessage(Title));
}
public override void Initialize(object validationModel)
{
base.Initialize(validationModel);
var obj = validationModel as StringInputViewModel;
if (obj != null)
{
Title = obj.Title;
}
}
}
}
```
Create the validation item
To create the validation item:
1. Go to */sitecore/System/Settings/Forms/Validations*.
2. Right-click **Validations**, click **Insert**, and click **Insert from Template**.
3. Select the `/System/Forms/Validation` template.
4. In the *Item Name* field, enter *Name Validation* and click **Insert**.
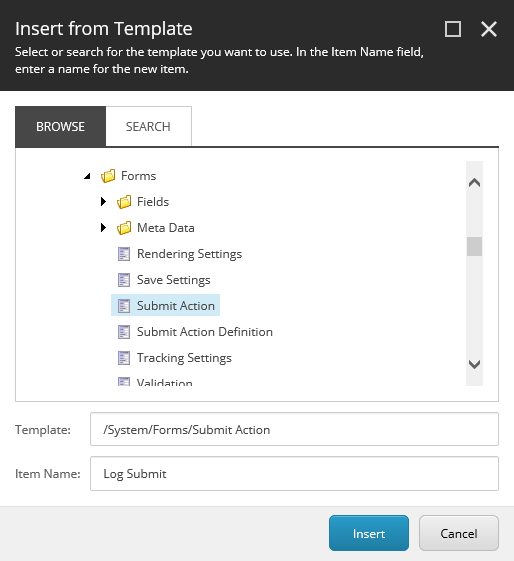
5. Navigate to the item you just created and in the **Settings** section, in the **Type** field, set the value to the class type name.
6. In the **Message** field, enter an error message, for example, *contains an invalid name*.
![Error message in the Message field]()
Modify the field type
Now you must modify the field type for which you want to use the new validation. In this example, we only want to use the new validation for the single-line field type.
To modify the field type
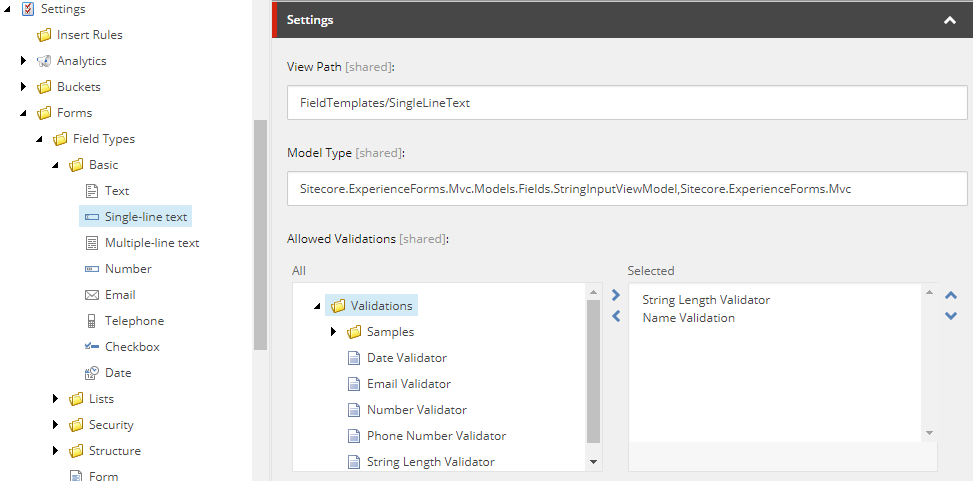
1. Go to */sitecore/system/Settings/Forms/Field Types/Basic/Single-line text*.
2. In the Settings section, in the **Allowed Validations** field, select the new validation item, for example, *Name validation*.
> [!note]
> Validators that are based on same validation type should not be enabled together on a field by the Form designer. For example, Email validator and Phone number validator are both based on regular expression validation and should not be enabled at the same time on a specific field. To prevent enabling same type validation on the field by the Form designer, we recommend that you not add validators of same type to the allowed validations list.
Add the validation to the field editor
Most elements have the FieldValidation control added to the field editor. If the validation is not shown by default, you can add the validation to the field editor:
> [!note]
> For the example in this walkthrough, you must have the Sitecore Rocks Visual Studio plugin. The plugin is compatible with Visual Studio 2019 or earlier.
1. Switch to the Core database and in the Content Editor, navigate to `/sitecore/client/Applications/FormsBuilder/Components/Layouts/PropertyGridForm/PageSettings/Settings` and click the element to which you want to add the validation.
2. In the **ControlDefinitions** field, add the **FieldValidation** control definition. You can find the control definition at: `/sitecore/client/Applications/FormsBuilder/Components/Layouts/PropertyGridForm/PageSettings/Common/Validation/FieldValidation`
![Specify control definition]()