---
title: "Run your first Sitecore instance"
slug: "run-your-first-sitecore-instance"
abstract: "This topic shows how you get a Sitecore image without customizations up and running."
---
# Run your first Sitecore instance
This topic shows how you quickly get an out-of-the-box *Sitecore Experience Platform - Single (XP0)* instance up and running with minimal configuration.
> [!note]
> Although this topic uses the *Sitecore Experience Platform - Single (XP0)* configuration for simplicity, you can use the same approach to start any configuration.
>
> Docker Compose files for each Sitecore topology are included in the *Sitecore Container Deployment Package* that you can download from the [Sitecore download page](https://developers.sitecore.com/downloads/Sitecore_Experience_Platform/104/Sitecore_Experience_Platform_104).
This topic assumes that your local environment is set up for developing with Docker on Windows. See [Environment setup](https://doc.sitecore.com/xp/en/developers/103/developer-tools/set-up-the-environment.html "Set up the environment") for details. Make sure you have switched to Windows containers.
You must also have a valid Sitecore license file.
> [!important]
> The default Sitecore container configuration uses specific ports. To avoid any conflicts, ensure that the following ports are not being used by another process: 443, 8079, 8081, 8984, and 14330.
[Troubleshooting Docker](https://doc.sitecore.com/xp/en/developers/103/developer-tools/troubleshooting-docker.html "Troubleshooting Docker") advice is available as well.
## The Sitecore Container Deployment package
The Sitecore Container Deployment package contains these files:
- `docker-compose.yml` and `.env` : Types of [Docker Compose](https://docs.docker.com/compose/) files. These are the main files necessary for launching a vanilla Sitecore instance.
- `mssql-data`, `solr-data`, and `traefik` - Supporting folders utilized by the Docker containers within your Sitecore instance.
- `compose-init.ps1` helper script.
Each of these is explained in more detail in the following sections.
The Docker Compose files
- `docker-compose.yml`
This Compose file is the main configuration file used by the `docker compose` command. It contains information about the different containers (referred to as *services*) and their configuration.
For Sitecore, the services generally represent the individual Sitecore roles that make up the topology (mssql, solr, id, cm, and so on).
- `.env`
This is an environment file. The values here provide default values for any environment variables referenced in the Compose file (for example `SITECORE_DOCKER_REGISTRY`), or you use it to configure Compose (for example `COMPOSE_PROJECT_NAME`).
Environment variables are the recommended way to pass configuration settings into containers. You can see how these are used in Sitecore containers in the `docker-compose.yml` file. The `mssql` service, for example, sets an environment variable to configure the SQL Server SA password (`SA_PASSWORD`):
```
mssql:
isolation: ${ISOLATION}
image: ${SITECORE_DOCKER_REGISTRY}nonproduction/mssql-developer:2017-${SITECORE_VERSION}
environment:
SA_PASSWORD: ${SQL_SA_PASSWORD}
ACCEPT_EULA: "Y"
ports:
- "14330:1433"
```
The value is sourced from the `.env` file using variable substitution (`${SQL_SA_PASSWORD}`).
> [!note]
> The SQL Server SA password must meet the [SQL Server password policy](https://learn.microsoft.com/en-us/sql/relational-databases/security/password-policy) requirements; otherwise, the SQL Server container might not work properly.
Preparation
The container package includes the `compose-init.ps1` script that performs the following preparation steps automatically:
- compresses the Sitecore license file
- creates the Identity Server token signing certificate
- populates the `.env` file
- generates the TLS/HTTPS certificates
- installs the root certificate into your Trusted Root Certification Authorities
- updates Windows host names.
> [!note]
> If you have already installed Traefik certificates in your Traefik folder, the script does not install new certificates.
To run this script:
1. Open a PowerShell administrator prompt. Navigate to the folder containing the `compose-init.ps1` file.
2. Run the following command, specifying the location of your Sitecore license file in the `-LicenseXmlPath` parameter:
```text
.\compose-init.ps1 -Topology "" -LicenseXmlPath "" -IdHost -CdHost -CmHost -SitecoreAdminPassword -SqlSaPassword
```
> [!note]
> The parameters you can use for the `compose-init.ps1` command are explained in the Sitecore XP 10.2.0 Developer Workstation Deployment with Docker guide, which you can find on the [Sitecore download page](https://dev.sitecore.net/Downloads/Sitecore_Experience_Platform.aspx).
Start Sitecore
To start Sitecore:
- Run the following command in the same folder as your Compose file:
```text
docker compose up -d
```
This command does the following:
- Downloads all required images from the Sitecore Container Registry.
- Creates a default network to use.
- Creates a container for each configured service.
- Starts the containers with their configured entrypoints.
> [!note]
> The `-d` (*detached mode*) tells Docker to start the containers in the background and leave them running. If you omit this, the container logs are streamed to the output instead, and you must type `Ctrl``+C` to return to a prompt. Doing this also stops and removes your containers.
>
> For a quick reference of this and other common commands used in this guide, see the [Sitecore Docker cheat sheet](https://doc.sitecore.com/xp/en/developers/103/developer-tools/sitecore-docker-cheat-sheet.html "Sitecore Docker cheat sheet").
View the running containers
To see the containers that you created:
- Run the `docker ps` command:
```text
docker ps
```
This displays a list of all running containers as indicated by a status of *Up*. You can also see the container ID, image being used, and ports the container is exposed on:
```
CONTAINER ID IMAGE COMMAND CREATED STATUS PORTS NAMES
75684e9146f2 traefik:v2.2.0-windowsservercore-1809 "/traefik --ping --a…" 7 seconds ago Up 3 seconds (healthy: starting) 80/tcp, 0.0.0.0:443->443/tcp, 0.0.0.0:8079->8080/tcp sitecore-xp0_traefik_1
67be2b1350e1 scr.sitecore.com/sxp/sitecore-xp0-cm:10.2.0-ltsc2019 "C:\\LogMonitor\\LogMo…" 21 seconds ago Up 11 seconds (healthy) 80/tcp sitecore-xp0_cm_1
e553b6ab0fb5 scr.sitecore.com/sxp/sitecore-xp0-cortexprocessingworker:10.2.0-ltsc2019 "C:\\LogMonitor\\LogMo…" 21 seconds ago Up 11 seconds (healthy) sitecore-xp0_cortexprocessingworker_1
8d40d14da8a2 scr.sitecore.com/sxp/sitecore-xp0-xdbautomationworker:10.2.0-ltsc2019 "C:\\LogMonitor\\LogMo…" 21 seconds ago Up 12 seconds (healthy) sitecore-xp0_xdbautomationworker_1
b4279d4f6de7 scr.sitecore.com/sxp/sitecore-id6:10.2.0-ltsc2019 "C:\\LogMonitor\\LogMo…" 27 seconds ago Up 21 seconds (healthy) 80/tcp sitecore-xp0_id_1
41418243fd0d scr.sitecore.com/sxp/sitecore-xp0-xdbsearchworker:10.2.0-ltsc2019 "C:\\LogMonitor\\LogMo…" 27 seconds ago Up 20 seconds (healthy) sitecore-xp0_xdbsearchworker_1
6f4e64033031 scr.sitecore.com/sxp/sitecore-xp0-xconnect:10.2.0-ltsc2019 "C:\\LogMonitor\\LogMo…" 27 seconds ago Up 21 seconds (healthy) 0.0.0.0:8081->80/tcp sitecore-xp0_xconnect_1
33931b923acb scr.sitecore.com/sxp/sitecore-xp0-mssql:10.2.0-ltsc2019 "powershell -Command…" About a minute ago Up 56 seconds (healthy) 0.0.0.0:14330->1433/tcp sitecore-xp0_mssql_1
3b362d8ed9a6 scr.sitecore.com/sxp/sitecore-xp0-solr:10.2.0-ltsc2019 "powershell -Command…" About a minute ago Up 56 seconds 0.0.0.0:8984->8983/tcp sitecore-xp0_solr_1
```
You might notice some of the statuses have `(health: starting)`, which means they are still warming up to meet the configured health check (see `healthcheck` in the `docker-compose.yml` file). If you run the `docker ps` command again, you can eventually see these all change to `(healthy)`.
Access Sitecore containers
You access the containers serviced by the reverse proxy with the HTTPS protocol, using their configured hostnames (for ex [https://xp0cm.localhost](https://xp0cm.localhost)).
The rest of the exposed containers are preconfigured to use specific ports (see `ports` in the `docker-compose.yml` file). In the default configuration of Docker Desktop for Windows, you access these ports on `localhost`.
This means you can access your *Sitecore Experience Platform - Single (XP0)* containers like this:
- Sitecore Content Management (cm): [https://xp0cm.localhost](https://xp0cm.localhost)
- Sitecore Identity Server (id): [https://xp0id.localhost](https://xp0id.localhost)
- Sitecore xConnect Server (xconnect): [http://localhost:8081](http://localhost:8081)
- Apache Solr (solr): [http://localhost:8984](http://localhost:8984)
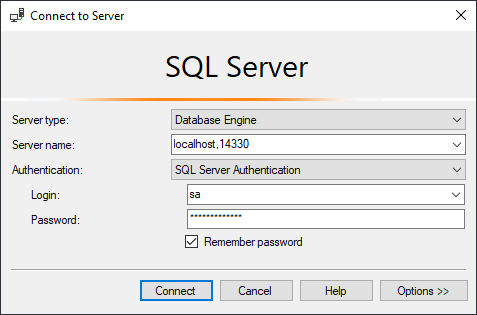
- Microsoft SQL Server (mssql): localhost,14330
- Traefik: [http://localhost:8079](http://localhost:8079)
### About connecting to SQL Server
When you connect to SQL Server using a port, the syntax is slightly different. You must use a comma (,) instead of a colon (:), as indicated previously. You can connect with SQL Server Authentication using the *sa* account and the value you specified for `SQL_SA_PASSWORD` in the `.env` file (`Password12345` by default in the `compose-init.ps1` file):
Populate schema and update indexes
The Sitecore container environment includes a `solr-init` container that runs on startup, creates the needed cores in your Solr container (if they do not exist already), and then exits. This is the expected behavior.
However, this container does not populate the Solr managed schemas or rebuild indexes. You need to do this manually or with custom scripting. You can see Solr-related errors in your container logs if you do not do this.
To populate the managed schema and update indexes:
1. Log in to Sitecore as `admin`.
2. Open the **Control Panel** and [populate the managed schema](https://doc.sitecore.com/xp/en/developers/103/platform-administration-and-architecture/solr-managed-schemas.html) for all search indexes.
3. While still in the **Control Panel**, [rebuild search indexes](https://doc.sitecore.com/xp/en/developers/103/platform-administration-and-architecture/rebuild-search-indexes.html).
Verify your instance
To verify your instance:
1. Browse to [https://xp0cm.localhost](https://xp0cm.localhost) to see the Sitecore default website.
2. Browse to [https://xp0cm.localhost/sitecore](https://xp0cm.localhost/sitecore) and verify you can log in to Sitecore. Use `admin` for the **User Name** and the value you specified for `SITECORE_ADMIN_PASSWORD` in the `.env` file (`Password12345` by default in the `compose-init.ps1` file) for the **Password**.
3. Look at the logs with the following command to see the logs from all containers:
```text
docker compose logs -f --tail 20
```
The `-f` (or `--follow`) option tells Docker to stream the output, and the `--tail` option limits the initial log output to the last 20 lines of each container. You can see that the logs are prefixed by the container.
4. Type `Ctrl+C` when you are done to return back to a prompt.
Stop Sitecore
To stop the Sitecore instance:
- Run the following command:
```text
docker compose stop
```
This stops your containers, but does not remove them. They can then be started again with `docker compose start`.
- To stop and remove the containers:
```text
docker compose down
```
This stops your containers, but also removes the containers as well as any networks that were created.
- To stop and remove containers, and also remove images:
Add `--rmi `.
Your development workflow will involve a combination of these commands. The commands are relatively fast, depending on the topology.
Persistent storage cleanup
There are now files in the *mssql-data* and *solr-data* folders. Like the *traefik* folder, these are folders mounted as [volumes](https://docs.docker.com/storage/volumes/) in the Compose file. They are configured in the `docker-compose.yml` file:
```
mssql:
[...]
volumes:
- type: bind
source: .\mssql-data
target: c:\data
solr:
[...]
volumes:
- type: bind
source: .\solr-data
target: c:\data
```
The folders are used as persistent storage for the database files for the *mssql* service and the index files for the *solr* service. This means that your database and index data remain even after a `docker compose down` command.
However, there are situations where you want to start fresh or you need to clear these due to stale data, for example, if you change the Sitecore administrator password.
You can manually delete the files in these folders, or you can use the `clean.ps1` script.
To delete the files:
1. Open a PowerShell administrator prompt in the *getting-started folder.*
2. Run the following command:
```text
.\clean.ps1
```
Further reading
- [https://docs.docker.com/compose](https://docs.docker.com/compose)
- [https://docs.docker.com/docker-for-windows/networking/](https://docs.docker.com/docker-for-windows/networking/)