---
title: "Walkthrough: Customizing the Address Editor rendering"
slug: "walkthrough--customizing-the-address-editor-rendering"
abstract: "Example of how to customize a rendering."
---
# Walkthrough: Customizing the Address Editor rendering
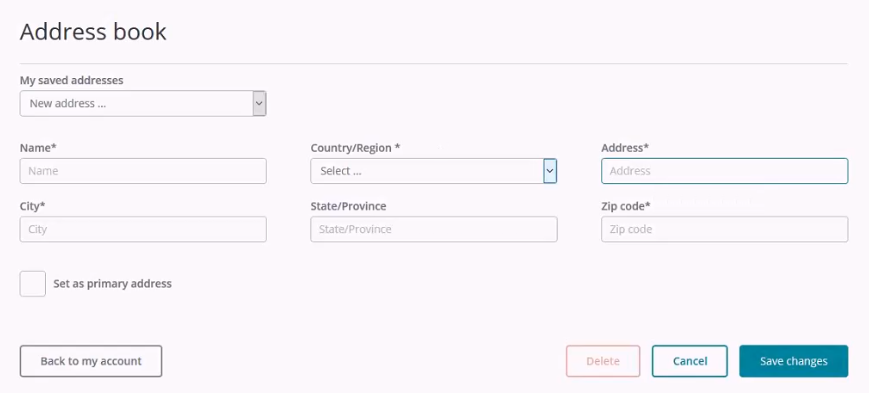
This walkthrough explains how to customize the [Address Editor](https://doc.sitecore.com/xp/en/users/103/sitecore-experience-commerce/commerce-account-renderings.html) rendering by adding a new address field to the address book component.
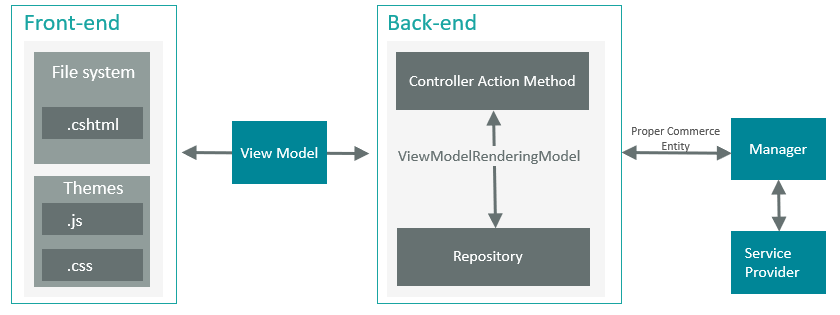
The basic [MVC](https://doc.sitecore.com/xp/en/developers/103/sitecore-experience-manager/mvc.html) architecture of the SXA Storefront is shown in the following diagram. In the same way as any MVC rendering, both the front-end and back-end components are included. The front-end consists of a View file and the JS script, which is part of the Commerce [base theme](https://doc.sitecore.com/xp/en/developers/103/sitecore-experience-commerce/using-the-commerce-base-themes.html "Using the commerce base themes").
This walkthrough describes how to:
- [Extend the Address Editor component](https://doc.sitecore.com/xp/en/developers/103/sitecore-experience-commerce/walkthrough--customizing-the-address-editor-rendering.html#UUID-d39131c3-c078-8e53-bfc0-b70ab5b8bafa_section-idm46026195577296 "Extend the Address Editor component")
- [Customize the rendering data source](https://doc.sitecore.com/xp/en/developers/103/sitecore-experience-commerce/walkthrough--customizing-the-address-editor-rendering.html#UUID-d39131c3-c078-8e53-bfc0-b70ab5b8bafa_section-idm45492042678480 "Customize the rendering data source")
- [Add the property mapping to the View model](https://doc.sitecore.com/xp/en/developers/103/sitecore-experience-commerce/walkthrough--customizing-the-address-editor-rendering.html#UUID-d39131c3-c078-8e53-bfc0-b70ab5b8bafa_section-5c65bd5c8e125-idm45693341606240 "Add the property mapping to the View model")
Extend the Address Editor component
To customize the rendering, you must first extend the Address Editor component, for example, by adding a new text field named Address2.
To extend the Address Editor component:
1. In Visual Studio, create a new project of type `class library`.
2. In the *Models* folder, create a new class called `MyAddressEditorInputModel` that inherits from the standard Storefront `AddressEditorInputModel` class, and add the following code:
```csharp
using Sitecore.Commerce.Engine.Connect.Entities;
namespace AddressBookExtensions.Models
{
public class MyAddressEditorInputModel: Sitecore.Commerce.XA.Feature.Account.Models.InputModels.AddressEditorInputModel
{
public string Address2 { get; set; }
public override CommerceParty ToPartyEntity()
{
var party = base.ToPartyEntity();
party.Address2 = this.Address2;
return party;
}
}
}
```
This code snippet overrides the component `ToPartyEntity` method with a new implementation that calls the original implementation and then maps the `Address2` property.
3. In the `AccountAddressControl.cs` file, create an endpoint to accept the new view model:
```csharp
public MyAccountAddressController(
IAddressRepository addressRepository,
IAddressEditorRepository addressEditorRepository,
IAccountManager accountManager,
IStorefrontContext storefrontContext,
IVisitorContext visitorContext,
IModelProvider modelProvider,
IContext sitecoreContext) : base(addressRepository, addressEditorRepository, accountManager, storefrontContext, visitorContext, modelProvider, sitecoreContext)
{
}
[System.Web.Http.HttpPost]
[ValidateHttpPostHandler]
[System.Web.Http.Authorize]
[ValidateAntiForgeryToken]
[OutputCache(NoStore = true, Location = OutputCacheLocation.None)]
public ActionResult MyAddressEditorModify(MyAddressEditorInputModel address)
{
var result = this.AddressEditorRepository.SaveAddress(address);
return this.Json(result, JsonRequestBehavior.AllowGet);
}
```
> [!note]
> This code snippet includes a call to the base constructor.
4. Register the new controller and model in the IoC [using a patch file](https://doc.sitecore.com/xp/en/developers/103/platform-administration-and-architecture/use-a-patch-file-to-customize-the-sitecore-configuration.html) (in this example called `Sitecore.Commerce.XA.Samples.AddressEditorExtensions.config`) containing the following code:
```xml
```
5. To customize the view, add the markup to show the new field on the rendering, copy the default rendering/view `AddressEditor.cshtml` to your custom view folder, and add the following:
```xml
```
6. From the base template *Scripts* folder, download the `JS` file for the component.
The component JS logic is contained in a base template located at */sitecore/media library/Base Themes/Commerce Components Theme*.
7. Modify the `account-address-editor-model.js` file and apply the required changes to add the `Address2` field binding to the Knockout view model. You do this by updating the `AddressEditorItemViewModel` (address) and adding the following line right after the `Address1` field initialization line:
```text
self.address2 = populate ? ko.validatedObservable(address.Address2).extend({ required: true }) : ko.validatedObservable().extend({ required: true });
```
8. Upload the modified file and override the existing file in the base theme.
Customize the rendering data source
To show the label and tooltip for the new custom field, you must customize the rendering data source.
To customize the data source:
1. To create a new folder in which to save customized renderings, in the Content Editor, right-click the *sitecore/Templates/Feature* folder, and click **Insert, Template folder**.
> [!important]
> We recommend that you create a new folder for customized renderings so that they are not over written when a Sitecore upgrade is installed.
2. In the **Message** window, enter a name for the folder and click **OK**.
3. In the content tree, select the newly created folder and, on the **Folder** tab, click **New Template**.
4. In the **Name** field, specify a name for the template, and select the default Address Editor data source template as the base template (*/sitecore/templates/Feature/Commerce Experience Accelerator/Account/Datasource/Address Editor*) , click **Next** and, on the **Location** page, accept the newly created folder as the location, click **Next** and then click **Close**.
5. Select the template you created in step 5 and, on the **Builder** tab, add a new simple text field for Address 2.
6. Save your changes.
7. In the *Data* folder for the site, create a new content item based on the newly created data source template and configure the Address Editor rendering to use it as the data source.
Add the property mapping to the View model
To view the *Address2* field in the Address Book component, add the property mapping to the view model of the component.
To add the property mapping to the View model:
1. Create a new model called `MyAddressItemJsonResult` that inherits from the default `Sitecore.Commerce.XA.Feature.Account.Models.JsonResults.AddressItemJsonResult` and override the `Initialize` method:
```csharp
public override void Initialize(CommerceParty address)
{
this.Address2 = address.Address2;
base.Initialize(address);
}
```
2. Create another model class called `AddressItemListJsonResult` that inherits from `Sitecore.Commerce.XA.Feature.Account.Models.JsonResults.AddressItemListJsonResult` and override the `Initialize `method:
```csharp
public override void Initialize(IEnumerable addresses)
{
foreach (var address in addresses)
{
var result = this.ModelProvider.GetModel();
result.Initialize(address);
this.Addresses.Add(result);
}
}
```
3. Override the `AddressItemListJsonResult` registration in the IoC to use the new implementation introduced and add it to the patch file (`Sitecore.Commerce.XA.Samples.AddressEditorExtensions.config`) that you created previously:
```xml
Sitecore.Commerce.XA.Samples.AddressBookExtensions.Models.JsonResults.AddressItemListJsonResult, Sitecore.Commerce.XA.Samples.AddressBookExtensions
```
4. Compile the project.
5. Copy the `.dll` file to the bin folder for the site and copy the `view .chtml` file to its corresponding custom view folder.
6. Reload the pages that contain the customized component.