---
title: "Add Sitecore modules"
slug: "add-sitecore-modules"
abstract: "Explains how you use Sitecore module asset images to include additional Sitecore modules when you build custom Sitecore Docker images."
---
# Add Sitecore modules
This topic introduces Sitecore module *asset images* and explains how you use these to include additional Sitecore modules when you build custom Sitecore Docker images. In the example used here, you add the [Sitecore](https://doc.sitecorepowershell.com/) [PowerShell Extensions (SPE)](https://doc.sitecorepowershell.com/) and Sitecore Experience Accelerator (SXA) modules to a *Sitecore Experience Platform - Single (XP0)* instance.
Clone the Docker Examples repository
If you have not already done so, clone the [Docker Examples repository](https://github.com/Sitecore/docker-examples) to a location on your machine, such as `C:\sitecore\docker-examples\` (the example uses this folder). We use the *custom-images* folder in the example.
## Prepare the example
The *custom-images* example requires some preparation before you can run it. If you have not already done so, either follow the [preparation steps](https://doc.sitecore.com/xp/en/developers/104/developer-tools/run-your-first-sitecore-instance.html "Run your first Sitecore instance") or run the included `init.ps1` script to perform the preparation steps automatically:
- Open a PowerShell administrator prompt, navigate to the *custom-images* folder, and run the following command, replacing the `-LicenseXmlPath` with the location of your Sitecore license file:
```text
.\init.ps1 -LicenseXmlPath C:\License\license.xml
```
Understand Sitecore module asset images
Sitecore provides officially supported module *asset images* that contain the required files and scripts you need to install a Sitecore module when you build your custom Sitecore images. Similar to your [your solution](https://doc.sitecore.com/xp/en/developers/104/developer-tools/build-sitecore-solutions.html "Build Sitecore solutions"), these asset images are intended as a source during build and they are not used at runtime.
There is a single asset image for each Sitecore module for each topology. Refer to the [Sitecore module reference](https://doc.sitecore.com/xp/en/developers/104/developer-tools/sitecore-module-reference.html "Sitecore module reference") for a list of all modules available.
Note there are no *xp0* images. For a *Sitecore Experience Platform - Single (XP0)* instance, you use the *xp1* images (for example, *sitecore-sxa-xp1-assets*).
Image structure
Each module asset image contains resources with this file structure:
- `C:\module\[role]\content` - Content to overlay base Sitecore images
- `C:\module\db` - dacpac files with changes to databases required by the module
- `C:\module\solr` - Files used to deploy Solr cores required for the module
- `C:\module\tools` - Additional tools and scripts to be executed during Docker image build process
Although you never run an asset image as a container, you can still explore the file system if you run the image with an interactive shell. The [Sitecore Docker cheat sheet](https://doc.sitecore.com/xp/en/developers/104/developer-tools/sitecore-docker-cheat-sheet.html "Sitecore Docker cheat sheet") explains how.
To install a given Sitecore module, use these resources to deploy files, database, and index changes to the base Sitecore runtime images during your custom image build process by adding the required Dockerfile instructions to your Sitecore runtime Dockerfiles.
Apply to Sitecore runtime images
The following example shows the configuration for adding the Sitecore PowerShell Extensions (SPE) and Sitecore Experience Accelerator (SXA) modules to a *Sitecore Experience Platform - Single (XP0)* topology.
### Add Dockerfile instructions
To add Dockerfile instructions for each role:
- **Content Management (CM) role**
Open the Sitecore runtime Dockerfile for the *cm* service (for example `C:\sitecore\docker-examples\custom-images\docker\build\cm\Dockerfile`). You can see the module asset images for SPE and SXA are brought in at the start with `ARG`s (configured in Docker Compose), and then initiated as named build stages `spe` and `sxa` to be used later on.
```
ARG SXA_IMAGE
ARG SPE_IMAGE
[...]
FROM ${SPE_IMAGE} as spe
FROM ${SXA_IMAGE} as sxa
```
The required *cm* Dockerfile instructions are added for both SPE and SXA, just after the `WORKDIR` instruction.
```
COPY --from=spe \module\cm\content .\
COPY --from=sxa \module\cm\content .\
COPY --from=sxa \module\tools \module\tools
RUN C:\module\tools\Initialize-Content.ps1 -TargetPath .\; `
Remove-Item -Path C:\module -Recurse -Force;
```
Notice the `COPY` instructions have been adjusted to:
- Use the actual named build stages of `spe` and `sxa` for the source `--from`
- Use a relative path `.\` for the destination, because the preceding `WORKDIR` sets the working directory to `C:\inetpub\wwwroot`
> [!tip]
> To optimize caching, add module instructions *before* any solution instructions, following the [Dockerfile best practice](https://doc.sitecore.com/xp/en/developers/104/developer-tools/dockerfile-best-practices-and-scenarios.html "Dockerfile best practices and scenarios") of ordering steps from *least to most frequently changing*.
- **Microsoft SQL Server (mssql-init) role**
Now open the Sitecore runtime Dockerfile for the *mssql-init* service (for example, `C:\sitecore\docker-examples\custom-images\docker\build\mssql-init\Dockerfile`). The same `ARG` and build stages are declared, and then the required *mssql-init* Dockerfile instructions are added for both SPE and SXA.
```text
COPY --from=spe \module\db \spe_data
```
- **Apache Solr Init (solr-) role**
Finally, open the Sitecore runtime Dockerfile for the *solr-init* service (for example, `C:\sitecore\docker-examples\custom-images\docker\build\solr-init\Dockerfile`). The same `ARG` and build stages are declared, and then the required *solr-init* Dockerfile instructions are added, in this case only for SXA.
```text
COPY --from=sxa C:\module\solr\cores-sxa.json C:\data\cores-sxa.json
```
> [!note]
> The SXA module is also included in the *cd* Sitecore runtime Dockerfile (for example, `C:\sitecore\docker-examples\custom-images\docker\build\cd\Dockerfile`), for use in *XP1* and *XM1* topologies.
### Configure in Docker Compose
To see how you configure this in Docker Compose:
- Open the `docker-compose.override.yml` file at the root of the *custom-images* folder (for example, `C:\sitecore\docker-examples\custom-images\docker-compose.override.yml`). The `cm` service is configured as follows:
```
cm:
image: ${REGISTRY}${COMPOSE_PROJECT_NAME}-xp0-cm:${VERSION:-latest}
build:
context: ./docker/build/cm
args:
BASE_IMAGE: ${SITECORE_DOCKER_REGISTRY}sitecore-xp0-cm:${SITECORE_VERSION}
SPE_IMAGE: ${SITECORE_MODULE_REGISTRY}sitecore-spe-assets:${SPE_VERSION}
SXA_IMAGE: ${SITECORE_MODULE_REGISTRY}sitecore-sxa-xp1-assets:${SXA_VERSION}
TOOLING_IMAGE: ${SITECORE_TOOLS_REGISTRY}sitecore-docker-tools-assets:${TOOLS_VERSION}
SOLUTION_IMAGE: ${REGISTRY}${COMPOSE_PROJECT_NAME}-solution:${VERSION:-latest}
[...]
```
The `SPE_IMAGE` and `SXA_IMAGE` values are configured to use the Docker image repositories for each module according to the Sitecore module reference. There are no *xp0* images, so SXA uses *sitecore-sxa-xp1-assets*.
The specific module image tag or version is defined with dedicated `SPE_VERSION` and `SXA_VERSION` variables. These are defined in the [environment file](https://docs.docker.com/compose/env-file/) (`.env`).
The remainder of the services (`mssql-init` and `solr-init`) are configured in a similar way.
Run Docker Examples
To run the Docker Examples:
1. Open a PowerShell prompt and navigate to the *custom-images* folder (for example, `C:\sitecore\docker-examples\custom-images`), and run Docker Examples with the Docker Compose `up` command:
```text
docker-compose up -d
```
2. After the instance is up and running, browse to [https://cm.dockerexamples.localhost/sitecore](https://cm.dockerexamples.localhost/sitecore) and log in to Sitecore. Use *admin* for the User Name and the value you specified for `SITECORE_ADMIN_PASSWORD` in the `.env` file (*Password12345* by default in `init.ps1`) for the password.
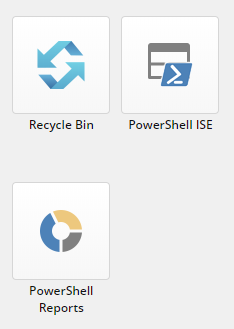
3. If you are familiar with Sitecore PowerShell Extensions (SPE) and Sitecore Experience Accelerator (SXA), you can quickly see that the modules are installed.
If you are not familiar, you can see additional buttons on the Launchpad: **PowerShell ISE** and **PowerShell Reports**. These are added by Sitecore PowerShell Extensions (SPE):
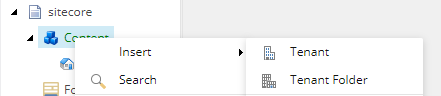
4. Open the Content Editor. On the root **Content** folder you can see the **Tenant** insert options. These are added by Sitecore Experience Accelerator (SXA):
5. When you are finished, stop and remove the containers using the `down` command:
```text
docker-compose down
```