---
title: "Deploying files into running containers"
slug: "deploying-files-into-running-containers"
abstract: "Explains how you deploy files into a running container."
---
# Deploying files into running containers
This topic explains how you configure a our Sitecore solution so you can deploy files from Visual Studio directly into locally running containers. You use this during development to ensure efficient feedback loops, as opposed to rebuilding your custom Sitecore images each time.
The following diagram is an overview of the deployment process:

Clone the Docker Examples repository
If you have not already done so, clone the [Docker Examples repository](https://github.com/Sitecore/docker-examples) to a location on your machine, for example, `C:\sitecore\docker-examples\`. In this topic, we use the *custom-images* folder as an example.
## Example preparation
The *custom-images* example requires some preparation before it can be run. If you have not already done so, either follow the [preparation steps](https://doc.sitecore.com/xp/en/developers/104/developer-tools/run-your-first-sitecore-instance.html "Run your first Sitecore instance") or run the included `compose-init.ps1` script to perform these preparation steps automatically:
- Open a PowerShell administrator prompt and navigate to the *custom-images* folder (for example, `C:\sitecore\docker-examples\custom-images`). Run the following command, specifying the location of your Sitecore license file in the `-LicenseXmlPath` parameter:
```text
.\compose-init.ps1 -LicenseXmlPath C:\License\license.xml
```
What are development ENTRYPOINT scripts?
The `ENTRYPOINT` provides the command to execute when the container is first run. All Sitecore runtime images have a default `ENTRYPOINT` configured as part of their Dockerfile instructions, so the images are ready to be run. You find the default `ENTRYPOINT` of any image with the `docker inspect` command.
Why a different script for development?
A typical Sitecore development workflow includes making code changes in multiple iterations, and building a solution to the web root of a running Sitecore instance. Because of the current [limitations of Docker for Windows](https://docs.docker.com/engine/reference/builder/#notes-about-specifying-volumes), the destination of a volume inside a container must be a non-existing or empty directory. It is not currently feasible in Docker containers with a mounted volume.
A workaround is to watch for changes in a separate mounted *hot* folder, and copy these changes into the Sitecore web root. To make sure that this watch process is initiated on startup, you can override the default Sitecore production `ENTRYPOINT`.
This combination of a watch process and a companion `ENTRYPOINT` is what is included in the *sitecore-docker-tools-assets* image.
The sitecore-docker-tools-assets image development ENTRYPOINT
In addition to other scripts that help you in the image build process, the *sitecore-docker-tools-assets* image contains the following scripts:
- Watch script:
`C:\tools\scripts\Watch-Directory.ps1`: watches source path for file changes and updates the destination path accordingly.
- ENTRYPOINT scripts:
- `C:\tools\entrypoints\iis\Development.ps1` : a development `ENTRYPOINT` script to use for IIS-based roles (for example, *cm*, *cd*, *xconnect*).
- `C:\tools\entrypoints\worker\Development.ps1` : a development `ENTRYPOINT` script to use for .NET Core-based worker roles (for example, *xdbsearchworker*, *xdbautomationworker*, or *cortexprocessingworker*).
Each of the *Development.ps1* scripts functions in the the same way:
- They start the watch process (`Watch-Directory.ps1`) as a background job if a directory is mounted into `C:\deploy`.
- They call the default Sitecore `ENTRYPOINT`.
> [!note]
> `C:\deploy` is the default source directory, but you can override this. You can customize parameters for the watch script to use different source and destination paths and also to exclude additional files and folders.
Understand the solution structure
Sitecore development with Docker introduces a new folder to a typical solution: the *docker* folder. The *docker* folder contains files and folders to support Docker development.
The *custom-images\\docker* folder has the following structure:
```
deploy
[environment]
[...]
```
Each of the `[environment]` folders serves as:
- A *destination* for your code deployment.
- A *source* for the development `ENTRYPOINT` watch script.
In this case, the *website* folder serves Sitecore website/platform containers (*cm*, *cd*, and so on) and the *xconnect* folder serves Sitecore xConnect containers (such as *xconnect*).
The Docker Examples environment projects
The Docker Examples repository has two projects that demonstrate file deployment scenarios. Go to the *custom-images* folder and open the solution *DockerExamples.sln* in Visual Studio:
- *DockerExamples.Website*: facilitates the build and publish of website/platform artifacts and includes a simple modification to the default `Sample Inner Sublayout.ascx` sublayout.
- *DockerExamples.XConnect*: facilitates the build and publish of xConnect artifacts.
In a [Helix solution](https://helix.sitecore.net/), the *DockerExamples.Website* and *DockerExamples.XConnect* projects are often broken out into separate environment modules and one or more project/feature modules, but they are combined here for the sale of simplicity.
Each of these projects has a **DockerDeploy** publish profile:
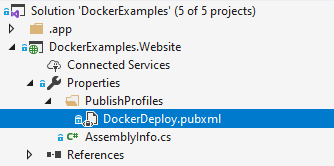
If you open the `DockerDeploy.pubxml` file for each profile, you can see that they are configured to publish to the corresponding *docker\\deploy* environment subfolders: **DockerExamples.Website** to *docker\\deploy\\website* and **DockerExamples.XConnect** to *docker\\deploy\\xconnect*.
### File deployment options
The Docker Examples solution is a simple example that uses a basic Visual Studio file publish. In a real-world solution, you mayuse more robust deployment mechanisms such as those included in [Team Development for Sitecore (TDS)](https://www.teamdevelopmentforsitecore.com/), Helix Publishing Pipeline (HPP), or your own custom approach.
However, the end goal is the same: to get your files to the appropriate *docker\\deploy* environment sub-folder.
This is similar to following the Sitecore development best-practice of deploying to your web root, but instead of sending files directly to the web root, you send them to *docker\\deploy*.
Apply to Sitecore runtime images
To enable runtime file deployment in your Sitecore images:
1. Open the Sitecore runtime Dockerfile for the *cm* service. You can see the `TOOLING_IMAGE` is brought in at the start with an `ARG` (configured in Docker Compose), and then initiated as a named build stage `tooling`:
```
ARG TOOLING_IMAGE
[...]
FROM ${TOOLING_IMAGE} as tooling
```
The `tools` folder (which includes the `ENTRYPOINT` scripts) is copied in from the `tooling` image (to `C:\tools`):
```text
COPY --from=tooling \tools\ \tools\
```
2. Open up the Sitecore runtime Dockerfile for the *xconnect* service, and you can see the same instructions here. Note these are also included in the *cd* Sitecore runtime Dockerfile for use in *XP1* and *XM1* topologies.
This is all that is needed in a Sitecore runtime Dockerfile.
> [!important]
> It is important that the `ENTRYPOINT` script and the watch script are copied to your image, and are therefore available at runtime.
To configure in Docker Compose:
1. Open the `docker-compose.override.yml` file at the root of the *custom-images* folder (for example, `C:\sitecore\docker-examples\custom-images\docker-compose.override.yml`).
The following example shows how the `cm` service is configured:
```
cm:
image: ${REGISTRY}${COMPOSE_PROJECT_NAME}-xp0-cm:${VERSION:-latest}
build:
context: ./docker/build/cm
args:
BASE_IMAGE: ${SITECORE_DOCKER_REGISTRY}sitecore-xp0-cm:${SITECORE_VERSION}
SPE_IMAGE: ${SITECORE_MODULE_REGISTRY}spe-assets:${SPE_VERSION}
SXA_IMAGE: ${SITECORE_MODULE_REGISTRY}sxa-xp1-assets:${SXA_VERSION}
TOOLING_IMAGE: ${SITECORE_TOOLS_REGISTRY}sitecore-docker-tools-assets:${TOOLS_VERSION}
SOLUTION_IMAGE: ${REGISTRY}${COMPOSE_PROJECT_NAME}-solution:${VERSION:-latest}
[...]
volumes:
- ${LOCAL_DEPLOY_PATH}\website:C:\deploy
[...]
entrypoint: powershell -Command "& C:\tools\entrypoints\iis\Development.ps1"
```
The following is a description of the configuration:
- The `TOOLING_IMAGE` build arg is configured to use the `sitecore-docker-tools-assets` image repository. The specific image tag or version is determined by the `TOOLS_VERSION` variable which is defined in the [environment file](https://docs.docker.com/compose/env-file/) (`.env`).
- Also in the `.env` file, the `LOCAL_DEPLOY_PATH` is set to the relative path of the *docker\\deploy* folder.
- This variable is used to expose the *docker\\deploy* `website` environment sub-folder (`.\docker\deploy\website`) to the running container at the default watch script source folder (`C:\deploy`) with a Docker [volume](https://docs.docker.com/compose/compose-file/#volumes).
- The default [entrypoint](https://docs.docker.com/compose/compose-file/#entrypoint) is overridden, set to the development `ENTRYPOINT` script.
2. The `xconnect` service is configured in a similar fashion. However, it maps the `C:\deploy` volume mount to the *docker\\deploy* `xconnect` environment sub-folder instead.
```
xconnect:
[...]
volumes:
- ${LOCAL_DEPLOY_PATH}\xconnect:C:\deploy
[...]
```
With this setup complete, you can now independently publish solution assets to either the website/platform or xConnect containers within your running Sitecore Docker instance.
Run Docker Examples
To run the Docker Examples:
1. Open a PowerShell prompt, navigate to the *custom-images* folder, and run Docker Examples with the Docker Compose `up` command:
```text
docker-compose up -d
```
2. When the instance is up and running, browse to [https://cm.dockerexamples.localhost](https://cm.dockerexamples.localhost). The familiar Sitecore default page now has a Docker logo added:

The logo is added in the `Sample Inner Sublayout.ascx` sublayout in the *DockerExamples.Website* project.
3. Open the `Sample Inner Sublayout.ascx` file in Visual Studio and make a change. For example, add a new paragraph below the Docker logo:
```xml
<%@ Control Language="c#" AutoEventWireup="true" TargetSchema="http://schemas.microsoft.com/intellisense/ie5" %>
```
4. Publish the *DockerExamples**.Website* project using the **DockerDeploy** publish profile (right-click on the *DockerExamples**.Website* project in **Solution Explorer** and click **Publish**).
> [!note]
> This publishes files to the *docker\\deploy* `website` folder. This triggers the watch script that copies them out to the *cm* container's web root.
5. When the publish is complete, refresh the [https://cm.dockerexamples.localhost](https://cm.dockerexamples.localhost) page in the browser and you can see your changes:

6. Stop and remove the containers using the `down` command:
```text
docker-compose down
```
Clean up the deploy folder
Just as the data folders for *mssql* and *solr*, files in your *docker/deploy* folders remain after a `docker-compose down`. To delete the files in these folders, use the included `clean.ps1` script.
To clean up the deploy folder:
- Navigate to the *custom-images* folder, and run the script in a PowerShell administrator prompt:
```text
.\docker\clean.ps1
```

