---
title: "Import and export a web design with Creative Exchange"
slug: "import-and-export-a-web-design-with-creative-exchange"
abstract: "How to import and export SXA site designs."
---
# Import and export a web design with Creative Exchange
[Creative Exchange](https://doc.sitecore.com/xp/en/developers/sxa/105/sitecore-experience-accelerator/working-with-creative-exchange.html "Working with Creative Exchange") is an SXA feature that enables front-end developers to work on static HTML, CSS, and JS files. You can export an SXA site or even a single page to send to your designers while content editors can continue working on the site. The export process creates a ZIP file of a page or the whole site with its theme and content included. Designers can [modify the files](https://doc.sitecore.com/xp/en/developers/sxa/105/sitecore-experience-accelerator/change-a-site-design-using-creative-exchange.html "Change a site design using Creative Exchange") to modify the site's look and feel. Once the design is ready, you can use the tool to import it back into the site.
Export a web design
To make the site available for designers to work on, you can export the site's wireframes and content using Creative Exchange.
To export a web design using Creative Exchange:
1. In the Experience Editor, on the ribbon, on the **Experience Accelerator** tab, click **Export**.
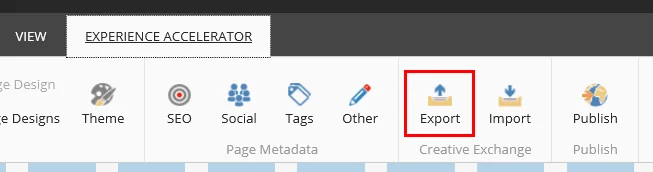
To export a web design in the Content Editor, click a site page and then on the ribbon, on the **Home** tab, click **Export**.
2. In the **Export settings** dialog, edit the settings:
| **Field** | **Description** |
| --- | --- |
| Device | Specify the device you want to export the site design to. If the device is not available, the layout may not be defined in Sitecore. Ask your Administrator for more information. |
| Exported Content | Specify what you want to export:
Single page – exports only the page you are editing.
Branch – exports the current page with all its descendants.
Site – exports all pages from the current site.
> [!note]
> For large sites, you should export the pages of the site separately. |
| Language | Select the language. |
| Site context | You can use the same page in different sites. Select the site for which you want to export the page. |
| Pages in buckets | Specify that you want to export items from item buckets.
Ignore – excludes items from item buckets.
Include – includes items from item buckets.
One of template – includes one item of each template from item buckets.
Note
Because item buckets can contain large number of pages, do not select this option unless it is explicitly required. |
| Mode | Select how you want to export the content:
Agency drop (preview mode, importable) – exports the pages almost identically to those viewed by visitors, but with some additions to facilitate importing them back into the system.
End-user site (normal mode, non-importable) – exports the pages identically to those viewed by visitors but cannot be imported back into your site. |
| Export to | Specify the destination for your exported content:
Zip file – creates a package of compressed files.
Folder on server – saves all the exported files directly to the server file system, where they can be managed by your revision control system. This can be convenient if you are working with external agencies and need to access the files through SVN or Git. |
| Maximum size of a single file in exported package | Enter a number to limit the size of zipped export files. This can be convenient when your site contains large assets, such as videos. |
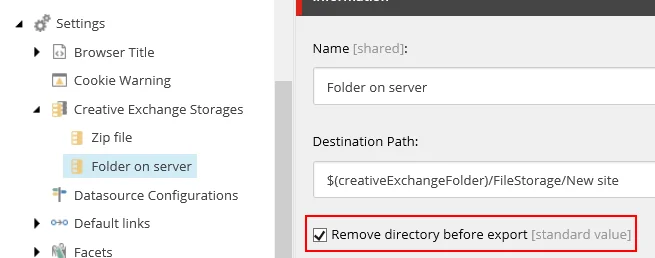
If you have many zip files from previous exports, you can remove these by selecting **Remove directory before export** in `/Settings/Creative Exchange Storages/Folder on server.`
3. Click **Next** to start the export.
Depending on the destination you selected, the ZIP file is available for download or the files are stored in a folder on your server. You can configure the path to store exported sites in the Destination Path field. Go to: `/Settings/Creative Exchange Storages/Folder on server`
> [!note]
> Possible reasons for your export to fail are: pages could not be rendered due to errors, linked assets are missing, or a Creative Exchange timeout.
Import a web design
Once the web design work is done, the folder can be zipped and imported back into the site using Creative Exchange.
To import a web design into the site:
1. In the Experience Editor, on the **Experience Accelerator** tab, click **Import**.
To import a web design in the Content Editor, click a site page and then on the ribbon, on the **Home** tab, click **Import**.
2. In the **Import settings** dialog box, select the source of the designs and click **Next**.
3. Depending on the source that you selected, follow the steps in the wizard, and then click **Next**.
4. You receive a confirmation message when the import is complete.
> [!note]
> Possible reason for your changes not to be reflected after import: the theme you changed is part of a restricted location.