---
title: "Walkthrough: Setting up a Commerce marketing automation campaign"
slug: "walkthrough--setting-up-a-commerce-marketing-automation-campaign"
abstract: "Learn how to set up a Commerce marketing automation campaign for abandoned carts, new orders placed, or recommended products."
---
# Walkthrough: Setting up a Commerce marketing automation campaign
You use [Commerce marketing automation campaigns](https://doc.sitecore.com/xp/en/developers/103/sitecore-experience-commerce/understanding-commerce-marketing-automation-campaigns.html) to re-engage with customers who have visited your storefront or to automatically confirm an order when a customer has completed a purchase. The following Commerce marketing automation campaigns are available:
- Storefront Abandoned Cart
- Storefront New Order Placed, which can be extended to encompass recommended products.
You can use the available [Commerce-specific elements](https://doc.sitecore.com/xp/en/developers/103/sitecore-experience-commerce/the-commerce-elements-in-a-marketing-automation-campaign.html) in your marketing automation campaigns.
> [!tip]
> To see how to set up a Commerce marketing automation campaign, watch the [video](https://www.youtube.com/watch?v=FPi6A9U5LdQ) available on the Discover Sitecore channel.
Before you start this walkthrough, you must have [created a site](https://doc.sitecore.com/xp/en/developers/103/sitecore-experience-commerce/create-a-commerce-tenant-and-site.html) with at least one Commerce MA Campaign selected. If required, you can [add a Commerce MA campaign module](https://doc.sitecore.com/xp/en/developers/sxa/103/sitecore-experience-accelerator/add-modules-to-site-and-tenant-scaffolding.html) to an existing site.
> [!warning]
> To use the Commerce marketing automation campaigns, you must have xDB installed and enabled.
This walkthrough describes how to:
- [Create an automated email campaign for Commerce](https://doc.sitecore.com/xp/en/users/103/sitecore-experience-commerce/walkthrough--setting-up-a-commerce-marketing-automation-campaign.html#UUID-b76d4563-af72-7085-d89d-77c0d37b827b_section-idm273117405223490 "Create an automated email campaign for Commerce")
- [Modify a marketing automation campaign](https://doc.sitecore.com/xp/en/users/103/sitecore-experience-commerce/walkthrough--setting-up-a-commerce-marketing-automation-campaign.html#UUID-b76d4563-af72-7085-d89d-77c0d37b827b_section-idm273117405277450 "Modify the marketing automation campaign")
Create an automated email campaign for Commerce
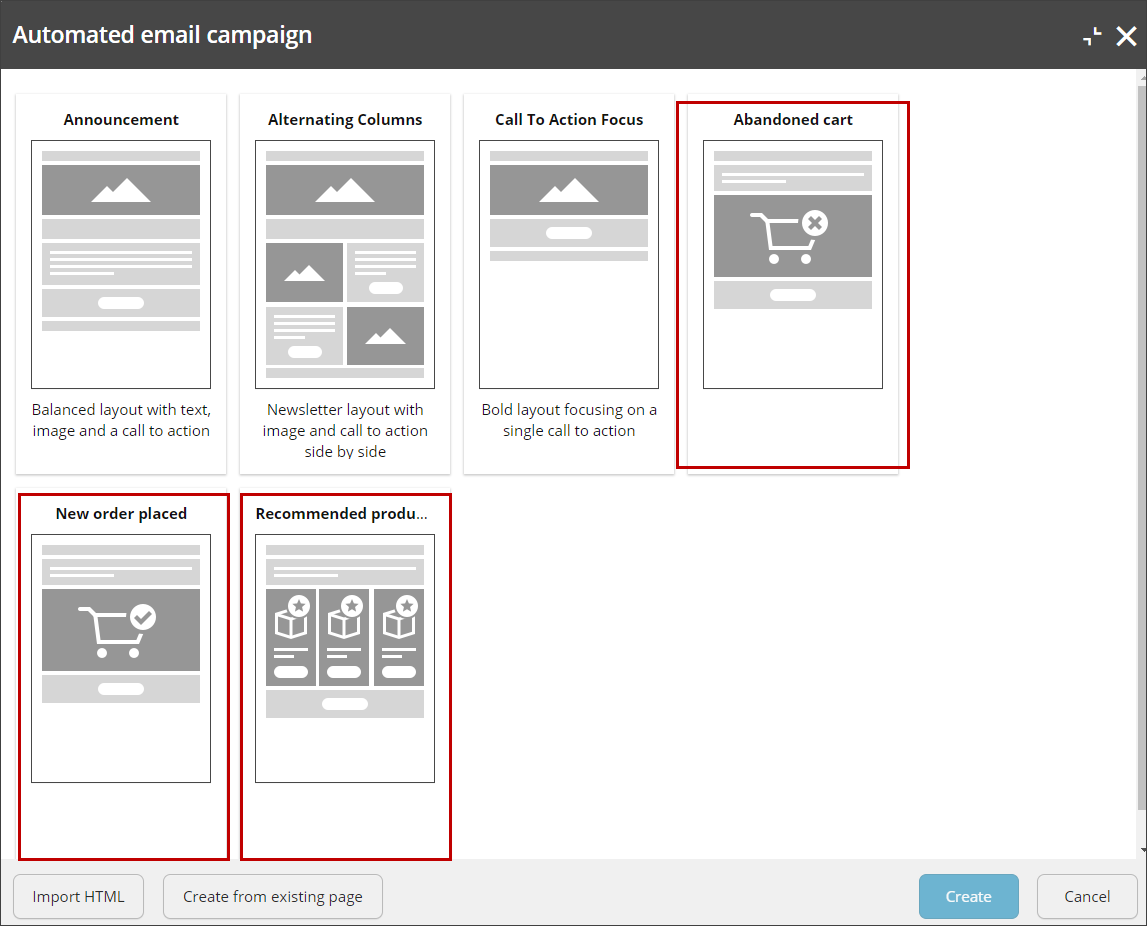
Commerce marketing automation campaigns use an automated email campaign template. Three templates are available: New order placed, Abandoned cart, and Recommended products.
To create an automated email campaign:
1. On the Sitecore Launchpad, click **Email Experience Manager**.
2. From the **Change Root Manager** list in the upper-left corner, select the email folder for the storefront site (for example, *Storefront Emails*).
3. To the right of the application window, click **Default settings** and, in the **Default Settings** dialog box, define the following parameters, and then click **OK**. At a minimum, specify the **Base URL** and the **From email** parameters.
| Setting | Description | Example |
| --- | --- | --- |
| *Base URL* | The website address of the Content Delivery server.This URL is used in all the links in the email message. | https://sxa.storefront.com |
| *Preview base URL* | In a scaled environment, internal links from test email messages point to the Base URL by default.To point the links to a different server, specify its URL in this setting. | |
| *From email* | The email address that you want to appear in the From field of your email messages. | noreply@sitecore.net |
| *From name* | The name that you want to appear as the From name on your email messages. | |
| *Reply to* | The email address that you want the replies from recipients sent to. | |
| *Global opt-out list* | A static contact list that contains contacts who click the **Unsubscribe from all link**. The contacts in this list never receive another email message from EXM, even if the contact appears in a list that you have included in an email campaign. | |
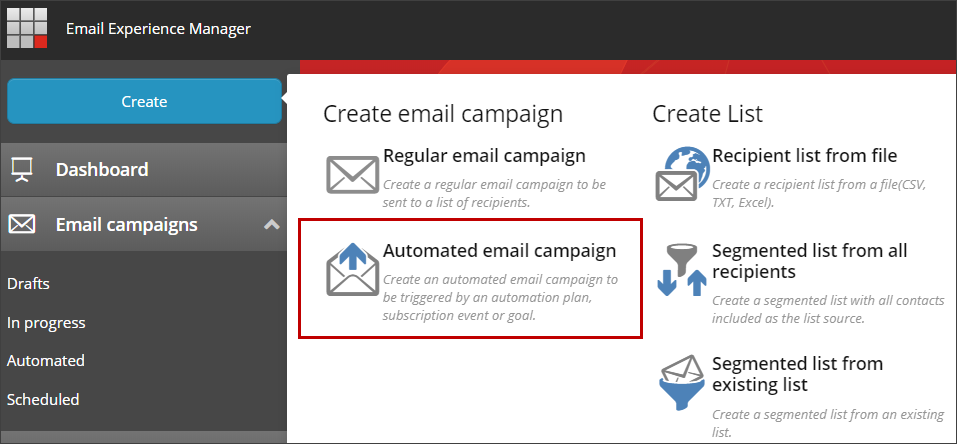
4. On the sidebar, click **Create** and, in the **Create email campaign** window, click **Automated email campaign**.
5. In the **Automated email campaign** dialog box, depending on the type of marketing automation campaign you are creating, click one of the following templates and then click **Create**:
- Abandoned cart
- New order placed
- Recommended products
> [!important]
> In order for images to display in the rendered email, in the Content Editor, go to *sitecore/Content//* and click Storefront Emails. On the Content tab, in the Message Generation section, click the Embed Images check box, and save your changes.
Specify email campaign settings
1. In the [email campaign builder](https://doc.sitecore.com/xp/en/users/exm/103/email-experience-manager/the-email-campaign-builder.html), on the **General** tab, provide a description for the campaign if required.
2. On the **Message** tab, click the body of the email.
The email body contains a [personalization token](https://doc.sitecore.com/xp/en/developers/exm/103/email-experience-manager/create-a-custom-personalization-token.html) shown as !PLACEHOLDER FIRSTNAME VALUE! that picks up the name of any contact who is signed into the storefront site. For recommended products, it also contains the Email product recommendations rendering.
3. In the **Edit body** dialog box, [modify the message logo and body](https://doc.sitecore.com/xp/en/users/exm/103/email-experience-manager/edit-the-content-and-layout-of-an-email-message.html) as required and then click **Save and close**.
4. If you are using the Recommended products rendering and want to change the number of recommended products displayed in the email message, click the **Email product recommendations** rendering and, on the toolbar, click **More, Edit Component Properties**. In the **Recommended Products Email Configurations** section, enter the maximum number of products and click **OK**. Click **Save and Close**.
5. On the **Delivery** tab, choose the delivery schedule and define notification settings.
6. Select the **Personalization** check box. When this option is selected, renderings are not cached.
7. If you are creating a *New Order Placed* email campaign, in the **Classification** section, click the **Service email campaign** check box to select it, and then click **Activate message**. A service message ignores suppression lists, opt-out lists, and sending limits.
8. In the **Confirm** prompt, click **OK**.
> [!note]
> To further customize how the list of recommended products is determined, see [Customize the data provider for recommended products](https://doc.sitecore.com/xp/en/developers/103/sitecore-experience-commerce/customizing-the-algorithm-for-recommended-products.html) and [Configuring an email rendering to output product content](https://doc.sitecore.com/xp/en/developers/103/sitecore-experience-commerce/configuring-an-email-rendering-to-output-product-content.html).
Modify the marketing automation campaign
Finally, you must add the email campaign to the marketing automation campaign. The Commerce marketing automation campaign template is created automatically during site creation when you add a Commerce MA campaign module.
> [!important]
> We recommend that you modify one of the predefined Commerce MA campaigns provided out of the box.
>
> The name of the Commerce marketing automation plan must adhere to the following naming convention: shopName + “ “ + templateName.
To modify the marketing automation campaign:
1. On the Sitecore Launchpad, click **Marketing Automation**.
2. On the **Marketing Automation** dashboard, click either the ** Abandoned Cart** or the ** New Order Placed** campaign.
3. On the canvas, click **Send commerce email** and, on the details pane, select the email campaign you just created, and click **Apply**.
> [!important]
> Do not use the Send email action in place of the Send commerce email action for Commerce.
4. Modify any of the other actions or conditions as required.
5. To save your changes, click **Save**.