- Personalization
Set up interactive personalization
You can use the Cloud SDK personalize package to run interactive experiences that are live in Sitecore Personalize. You typically run interactive experiences in components in a webpage, not necessarily on the webpage itself. Running the experience will return an API response, which contains the personalized content. You can use the API response to display content to your site visitor or take other actions, depending on your application requirements.
This walkthrough describes how to:
- Find the friendly ID in Sitecore Personalize
- Run the experience on your site
- Verify that the experience is running
-
Have a live interactive experience in Sitecore Personalize to work with.
-
In your code editor, open the root folder of your web app.
-
Install and initialize the Cloud SDK and the
personalizepackage.
Find the friendly ID in Sitecore Personalize
The first step to running an interactive experience is to find its friendly ID.
To find the friendly ID:
-
In Sitecore Personalize, click Experiences.
-
Click the live interactive experience you want to run.
-
On the page of the experience, click Build summary. The friendly ID is in the Details pane.
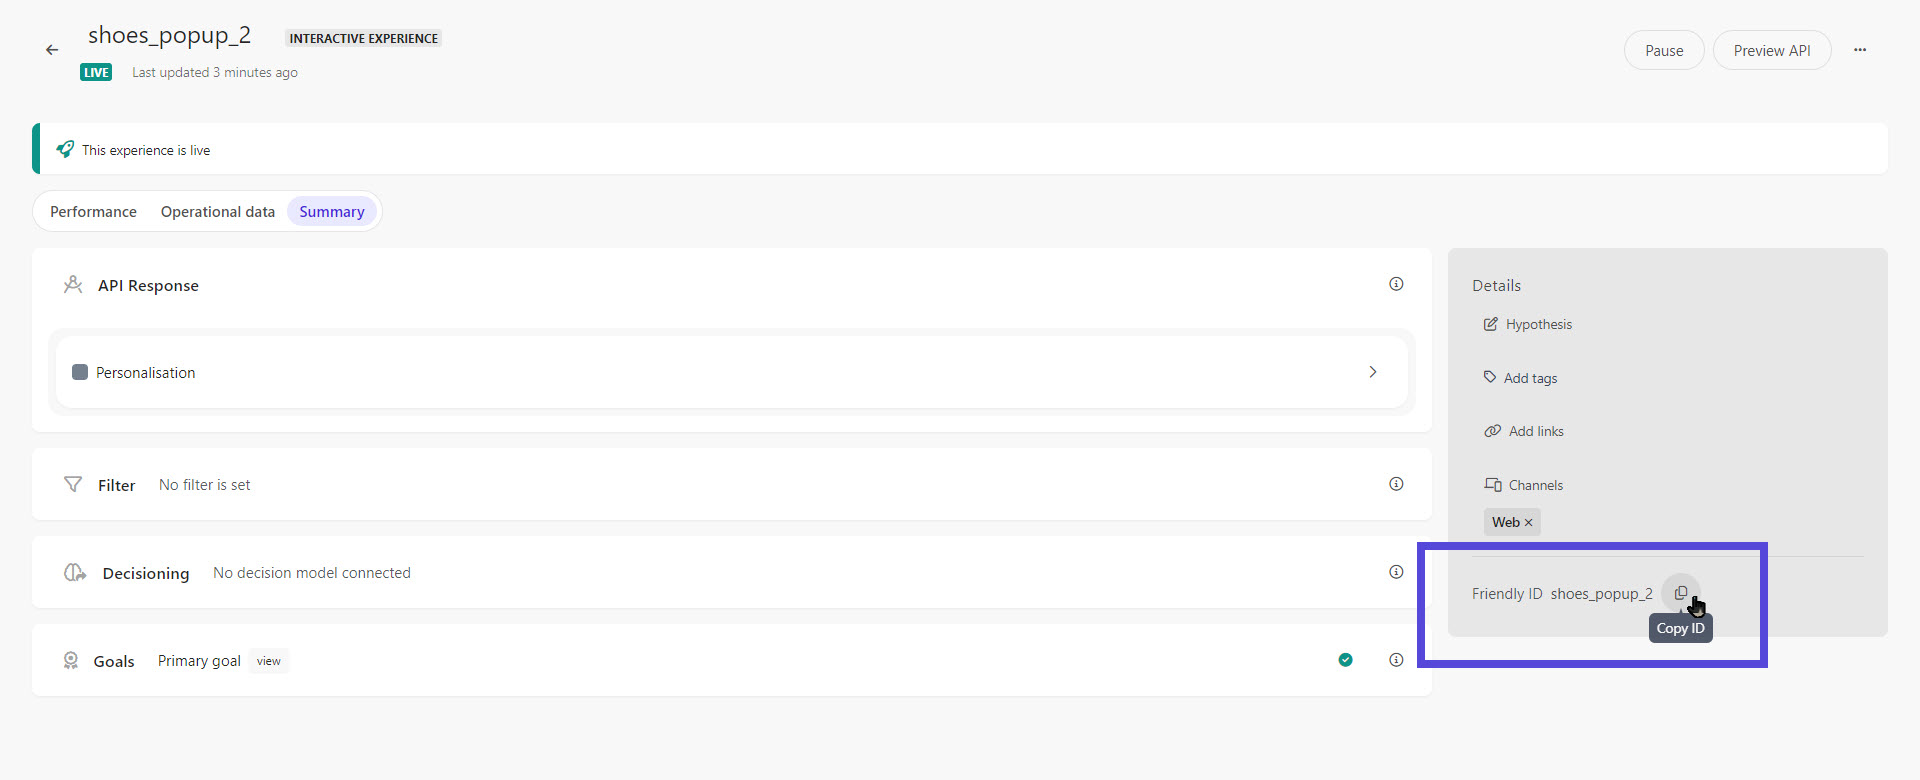
-
Make a note of the friendly ID. You'll use it in the next procedure to run the experience.
Run the experience on your site
After finding the friendly ID of the experience, you update your Cloud SDK code in the source code of your web app and run the experience on your site.
To run the experience:
-
In your code editor, in the source code of your web app, open one of your components, for example,
src/components/Promo.tsx. -
At the top of the file, import
useEffectfromreactand thepersonalizefunction from thebrowsermodule of thepersonalizepackage. -
In the
Defaultcomponent, on the first line of the function body, paste the following code, then save your changes:Replace the placeholder value with the friendly ID of your experience.
When the webpage loads, this code runs the experience and logs its API response to the console.
TipIn production, we recommend you pass more event and experiment data to the
personalizefunction to make sure that your web app captures rich event data.
To run the experience:
-
In your code editor, in the source code of your web app, create a component, for example,
src/app/components/Promo.tsx. -
Paste the following code into
Promo.tsx, then save your changes:This code imports
useEffectfromreactand thepersonalizefunction from thebrowsermodule of thepersonalizepackage. -
Inside the default function, before the
returnstatement, paste the following code, then save your changes:Replace the placeholder value with the friendly ID of your experience.
When the webpage loads, this code runs the experience and logs its API response to the console.
TipIn production, we recommend you pass more event and experiment data to the
personalizefunction to make sure that your web app captures rich event data.
Verify that the experience is running
After updating your code, it's a good idea to check that the experience is running on your site.
To verify that the experience is running:
-
In your terminal, enter
npm run start:productionto start your JSS Next.js app.TipIf your app fails to compile due to linting errors, consider disabling ESLint rules.
-
In your web browser, navigate to your JSS Next.js app, typically at
http://localhost:3000. -
In your web browser's developer tools, on the Console tab, verify that you see the following log in the console:
This log contains the response that was created for this experience in Sitecore Personalize.
-
In the developer tools, on the Network tab, in the Filter field, paste the following URL:
edge-platform.sitecorecloud.io.Doing this lists the network requests made to Sitecore.
-
In the list of requests, click a
POSTrequest with a status of200 OKand a name that starts with personalize. -
In the request details pane, click the Response tab for the request.
The API response appears. This is the response that was created for this experience in Sitecore Personalize.
To verify that the experience is running:
-
In your terminal, enter
npm run devto start your Next.js app, then open theproductspage of your app in your web browser. -
In your web browser's developer tools, on the Console tab, verify that you see the following log in the console:
This log contains the response that was created for this experience in Sitecore Personalize.
-
In the developer tools, on the Network tab, in the Filter field, paste the following URL:
edge-platform.sitecorecloud.io.Doing this lists the network requests made to Sitecore.
-
In the list of requests, click a
POSTrequest with a status of200 OKand a name that starts with personalize. -
In the request details pane, click the Response tab for the request.
The API response appears. This is the response that was created for this experience in Sitecore Personalize.
Next steps
You've now successfully run the experience on your site and received the API response for the experience in your web app. You can now proceed to work with the response, for example, by displaying its content on your site.
Next, you can:
- Learn more about running personalizations.
- Run Sitecore Personalize web experiences.
- Explore the reference documentation for the
personalizepackage. - Set up other Sitecore DXP capabilities, such as using tracking to capture
VIEW,IDENTITY, and custom events.