Certificates
Client certificates
When you have installed Sitecore XP, you can see the thumbprint values of the XConnectCert parameters in the following connection strings in the \App_config folder:
-
ConnectionStrings.configfor Sitecore and xConnect roles: -
AppSettings.configfile for the xConnect roles:
Server certificates
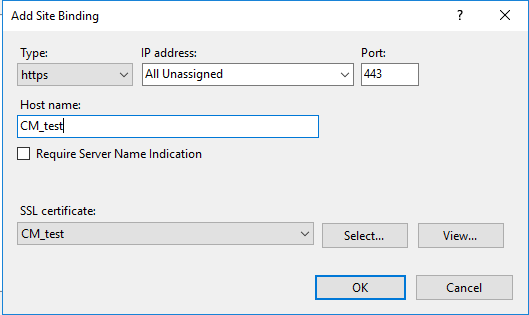
After you install Sitecore XP, your IIS site will have an HTTPS binding and an associated SSL certificate with the same name. For example, if the site is named CM_test , the HTTPS binding and associated SSL certificate are also named CM_test.
Configure a new client certificate
If your client certificate has expired, you must configure Sitecore to use a new client certificate.
To configure Sitecore to use a new client certificate:
-
Install the new client certificate on every computer on which you have installed the xConnect client and ensure that the authority that issued the certificate is in the Trusted Authorities list.
For more information about the appropriate role and the certificate that you must install, see the section Set up the certificates.
-
To grant the appropriate permissions to the certificate, open the Microsoft Management Console, click File, and then click Add/Remove Snap-in.
-
In the Add or Remove Snap-ins dialog box, in the Available snap-ins field, select Certificates and then click Add.
-
In the Certificates snap-in dialog box, select Computer account and then click Next.
-
In the Select Computer dialog box, select Local computer and then click Finish.
-
In the Add or Remove Snap-ins dialog box, click OK.
-
In the Console window, in the left-hand pane, navigate to the Certificates (Local Computer)/Personal/Certificates folder.
-
In the center pane, right-click the new certificate, click All Tasks, Manage Private Keys.
-
In the Permissions dialog box, add the accounts that you want to grant permissions to, based on the following criteria:
-
For virtual accounts that were created for each Sitecore application pool identity, add for example:
IIS AppPool\
– for virtual accounts. NETWORK SERVICE account – only if the Sitecore website application pools run under the NetworkService identity.
LOCAL SERVICE account – the Marketing Automation Engine runs under this account.
-
For virtual accounts that were created for the xConnect application pool identity for the website hosting the xDB Automation Operations role, add for example:
IIS AppPool\
– for virtual accounts.
-
-
In the
\App_Config\connectionstrings.configfile, in the appropriate connection strings, replace the old thumbprint parameter value with the new client certificate thumbprint. -
Update the thumbprint values in all of the certificate connection strings on the following Sitecore instances:
XP Scaled (XP1) Content Delivery Content Management Processing Marketing Automation Engine xDB Automation Operations For example, on each XP Single (XP0) Sitecore instance, update the thumbprint value in these connection strings:
-
In the xConnect root folder, in the
\App_Config\AppSettings.configfile, update the thumbprint value in the following setting:You must update this setting on the following servers:
XP Scaled (XP1) xConnect Collection XConnect Search xDB Reference Data xDB Automation Reporting xDB Automation Operations Sitecore Cortex Processing Engine Sitecore Cortex Reporting Service -
Restart IIS on every computer that you configured to use a new client certificate.
Configure Sitecore XP to use new server certificates
To configure Sitecore XP to use new server certificates:
-
Replace all of the old server certificates with new server certificates on each server with the XM Scaled (XM1) role.
-
Replace all of the old server certificates with new server certificates on each server with the XP Scaled (XP1) role.
NoteThe common name field (CN) must be the same as your instance name.
-
On each IIS instance, in the Site Bindings window, select the new server certificate.
-
Restart IIS on every computer that you configured to use the new server certificates.