Creating your first plugin
This example uses a new plugin called Plugin.Sample.Loyalty.
To add your new plugin, use the new template added by the Visual Studio extension:
To create your first plugin:
-
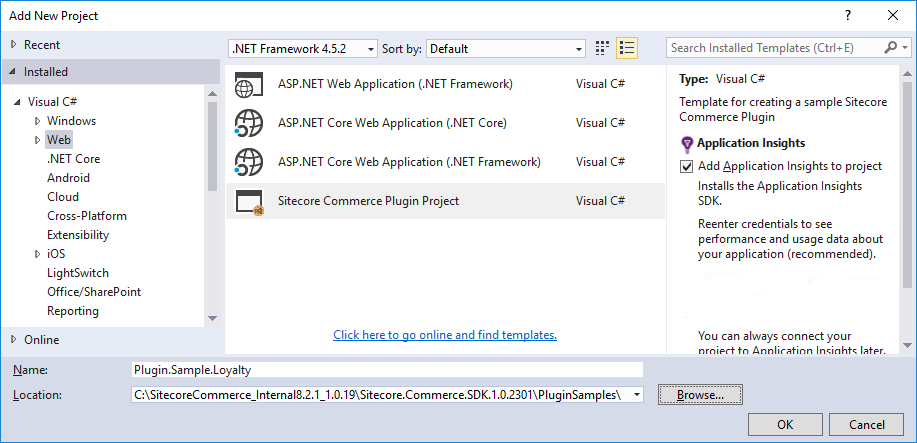
Give your plugin a namespace and name.
-
Select the folder to add your plugin to.
In the following example, the plugin is added to the PluginSamples folder in SDK.
Do not try to add your plugin to a folder outside SDK, as the file paths can conflict with proper builds:

-
To construct your plugin and add it to your Visual Studio project with a sample Command/Pipeline, click OK.
The system displays three errors (simple fix-up errors).

-
To fix the namespace error, accept the suggestion to change the path to
Sitecore.Commerce.Core:
-
Once you have fixed the namespace error, fix the other three errors:

-
Follow the suggested fixes for the first two errors. For the third error, fix it by adding the following using to the
ConfigureSitecoreclass:
After these minor fixes, your Visual Studio project should build successfully.
The new plugin has an end-to-end sample named Sample that shows an extension from the controller level all the way through running a pipeline. In many cases, you will not want to create a new pipeline, but instead want to extend an existing pipeline to add new processing blocks. You can delete these samples, but we recommend that you keep the samples until you are sure you no longer need them. You can copy and paste from the sample to create new items, such as components, because the sample item contains the necessary structure. Then you can change the naming to your preferred patterns.
Once the plugin builds, you must add it to the Sitecore.Commerce.Engine project as a reference so that the plugin will be pulled in during a build/publish:
-
Expand the
Sitecore.Commerce.Engineproject, right-click the Dependencies node, select Add Reference, and add a reference to your new project.When the file is saved, it resolves the dependency and loads it when the application is launched.
-
Once you build the project, press F5 to run the solution in debug mode as you did previously. The solution now pulls in your new plugin.