Deploy Sitecore Connect for Content Hub in a new PaaS environment
This topic describes how to use the Sitecore Azure Toolkit (SAT) to include the Sitecore Connect for Content Hub (SCCH) connector in a new Sitecore Azure Cloud Service (Paas) environment. The procedure depends on whether you have a Sitecore Experience Manager (XM) or Sitecore Experience Platform (XP) installation.
If you have an existing Sitecore Azure PaaS environment, use the instructions in Deploy Sitecore Connect for Content Hub in an existing PaaS environment instead.
Prepare for installation
Prepare for installation
This section explains what you must prepare before adding the Sitecore Connect for Content Hub (SCCH) connector to the Sitecore Azure Toolkit (SAT) configuration.
Before you add the SCCH module for SAT, you must have the following:
-
An Azure account with access to Azure cloud storage with Azure Storage Explorer.
To prepare for installation, download the following resources:
-
The Sitecore Azure Toolkit available at the Sitecore download page.
-
The Sitecore Identity WDP package available at the Sitecore download page.
-
The Sitecore Connect for Content Hub (SCCH) 5.0 WDP package available at the Sitecore download page.
-
The Sitecore Experience Platform (XP) WDP package available at the Sitecore download page of the Sitecore version you are using, in the Download options for Azure AppService section.
-
The SXP ARM template script folder
Sitecore <version>\<typology>, available at Sitecore Azure Quickstart Templates Github. -
The SCCH ARM template script
azuredeploy.json, available at Sitecore Azure Quickstart Templates Github in theConnectors\SCCH <version>\<typology>folder
For a comprehensive look at SAT deployment steps, see the Sitecore Azure Toolkit Overview and the Sitecore Azure Toolkit Deployment Guide .
Deploy SXP with SCCH to Azure on XM
Deploy SXP with SCCH to Azure on XM
To enable the SAT bootloader to perform post-step or transformation instructions, you must prepare the template scripts and bootloader resources and add them to Azure.
For Sitecore XM installation:
-
Extract all the content in Sitecore Connect for Content Hub 5.0 WDP package to a new folder named, for example,
WDP. Navigate to theContent\Website\bin\scchfolder. -
For Sitecore XM version 10.0 and 10.1, copy the
Microsoft.Extensions.DependencyInjection.Abstractions.dllassembly to theContent\Website\binfolder. -
For all versions of Sitecore XM, copy the
Microsoft.Extensions.Caching.Abstractions.dllassembly to theContent\Website\binfolder. -
Repack the contents of the
WDPfolder into a new WDP package, and name itscwdp.zip, replacing thescwdp.zipin the original download. -
In Azure Storage Explorer, upload the following files to Azure blob Containers:
File
Source
URL parameter
azuredeploy.jsonWhere you downloaded the SCCH ARM template script.
Bootloader template URL
scwdp.zipContent\Website\binSCCH 5.0 template URL
Sitecore.Cloud.Integration.Bootload.wdp.zipSitecore Azure Toolkit\resources\{version}\AddonsBootloader WDP URL
bootloader.jsonWhere you downloaded the SXP ARM template script.
ARM template URL
-
In Azure Storage Explorer, for each uploaded file, click Copy URL and save the URL to use as the URL parameter mentioned in the table.

-
On your server, in the Sitecore Platform ARM template folder, open the
azuredeploy.parameters.jsonfile. -
Add a new parameter named
modules, and fill in the URLs you saved: -
Continue with the steps of deploying a new Sitecore environment to the Microsoft Azure App service. In the final step, after you invoke the deployment command in PowerShell, wait for the PowerShell script to complete all the tasks.
-
In the Azure resource group, on the Deployments tab, verify the deployment status for the bootloader and SCCH 5.0:
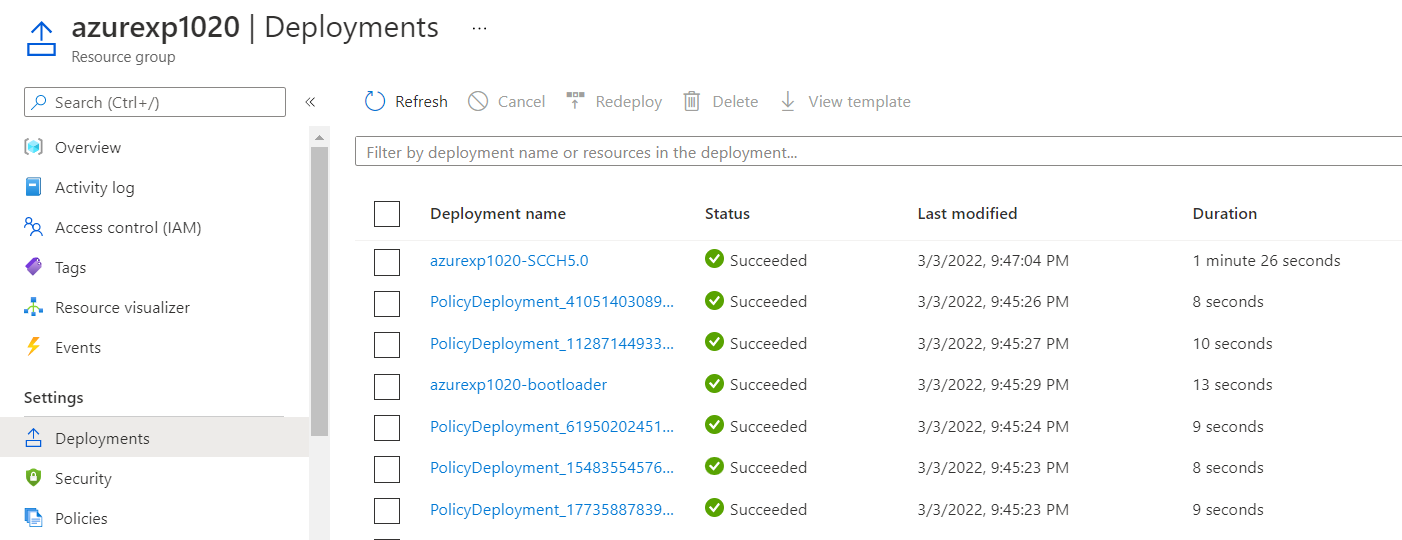
Deploy SXP with SCCH to Azure on XP
Deploy SXP with SCCH to Azure on XP
To enable the SAT bootloader to perform post-step or transformation instructions, you must prepare the template scripts and bootloader resources and add them to Azure.
For Sitecore XP installations:
-
In Azure Storage Explorer, upload the following files to Azure blob Containers:
File
Source
URL parameter
azuredeploy.jsonWhere you downloaded the SCCH ARM template script.
Bootloader template URL
scwdp.zipContent\Website\binSCCH 5.0 template URL
Sitecore.Cloud.Integration.Bootload.wdp.zipSitecore Azure Toolkit\resources\{version}\AddonsBootloader WDP URL
bootloader.jsonWhere you downloaded the SXP ARM template script.
ARM template URL
-
In Azure Storage Explorer, for each uploaded file, click Copy URL and save the URL to use as the URL parameter mentioned in the table.
-
On your server, in the Sitecore Platform ARM template folder, open the
azuredeploy.parameters.jsonfile. -
Add a new parameter named
modules, and fill in the URLs you saved: -
Continue with the steps of deploying a new Sitecore environment to the Microsoft Azure App service. In the final step, after you invoke the deployment command in PowerShell, wait for the PowerShell script to complete all the tasks.
-
In the Azure resource group, on the Deployments tab, verify the deployment status for the bootloader and SCCH 5.0: