ウォークスルー
このページの翻訳はAIによって自動的に行われました。可能な限り正確な翻訳を心掛けていますが、原文と異なる表現や解釈が含まれる場合があります。正確で公式な情報については、必ず英語の原文をご参照ください。
サイト作成時にCommerceマーケティングオートメーションキャンペーンを選択すると:
-
メールマネージャーのルートは、Emailsという命名規則で作成されます。
-
Commerceのメールで使われるテンプレートは /sitecore/Templates/Feature/Commerce Experience Accelerator/Emailsフォルダにあります。
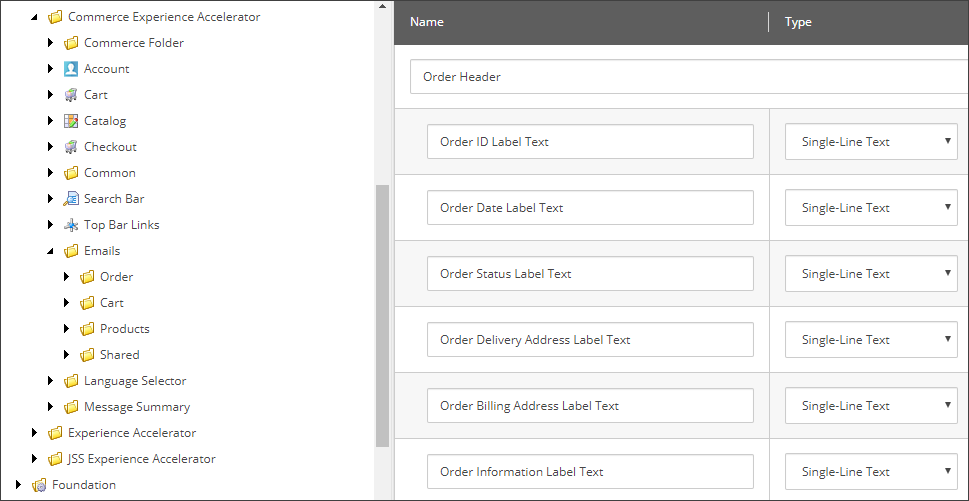
-
Commerceの メールで使用されたレンダリング はsitecore/Layout/Renderings/Feature/Commerce Experience Accelerator/Commerce Emailsフォルダにあります。
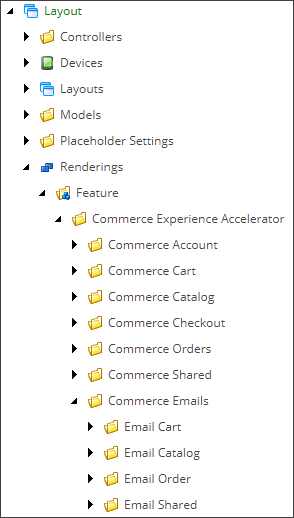
-
商務メールで使用されるレイアウトはsitecore/Layout/Layouts/Feature/Commerce Experience Accelerator/Commerce Emailsフォルダにあります。
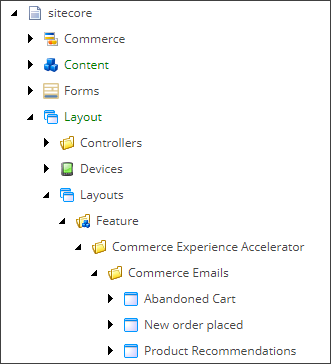
顧客がカートを操作したり注文を行ったりすると、その顧客は自動的に該当するマーケティング自動化プランに追加されます。自動化サービスはプランを評価し、顧客にメールを送信する必要があるかどうかを判断します。自動化サービスからメールが送信されると、メールリクエストは メッセージバスに送信されます。Content Management (CM)サーバーはこの情報を受け取り、コマースクエリパラメータを含むURLを作成します。これはメールレンダリングに含まれ、放棄されたカートメールメッセージや注文されたメールメッセージの形で顧客に送信されます。
!注コンポーネント(例えばメールメッセージ)をカスタマイズする際にコードを変更する必要を避けるために、データテンプレート上でラベルやメッセージを定義してください。
提供されたテンプレートを使いたくない場合は、独自のCommerceメールメッセージテンプレートを作成するか、既存のテンプレートを拡張することができます。そのためには:
- メッセージ内容欄の作成または修正。
- メッセージレンダリングを修正する
- メールメッセージでレンダリングするためにCommerceデータを取得してください。
- メールブランチテンプレート用のレンダリングを作成します。
!注Send Emailのマーケティングアクションには、メールメッセージ内に商取引データは含まれていません。
例えば、「新しい注文を置いた」メールメッセージは、エクスペリエンスエディターで次のように表示されます。
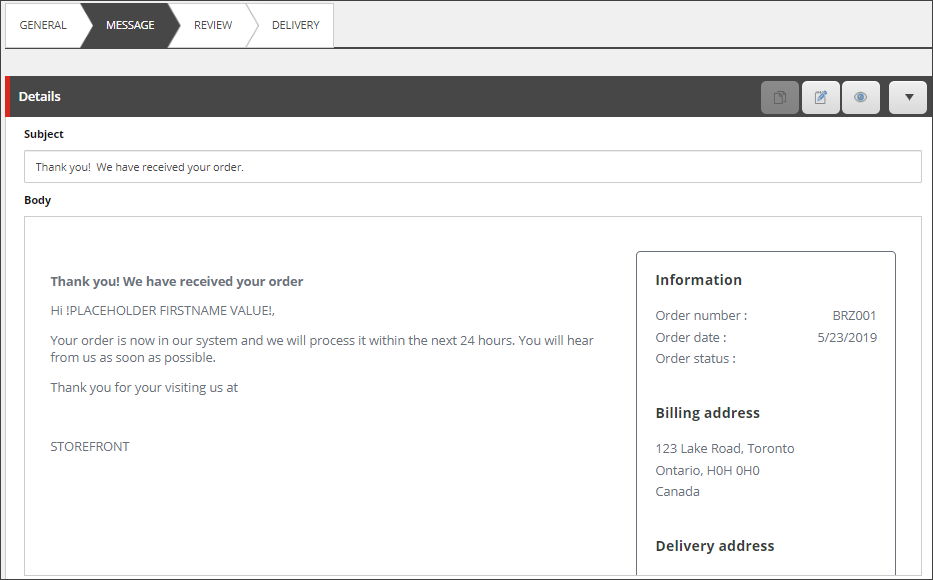
メッセージ内容フィールドの作成または変更
メッセージ内容フィールドの作成または変更:
-
Sitecore Launchpadで「 Content Editor」をクリックしてください。
-
sitecore/Templates/Feature/Commerce Experience Accelerator/Emailsに行って。
-
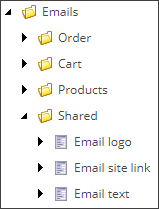
Cart、Order、Products、またはSharedフォルダを展開します。
-
メールのコンポーネント(ヘッダー、行、合計など)を選択します。
-
ビルダータブで、テンプレートのフィールドラベルやタイプを追加、修正、削除できます。
-
変更を保存するには「 保存 」をクリックしてください。
メッセージレンダリングを修正する
- コンテンツエディターでsitecore/Layout/Renderings/Feature/Commerce Experience Accelerator/Commerce Emailsフォルダに移動します。
- Email Cart、カタログ、Order、またはSharedフォルダを展開してください。
- メールコンポーネント(カートの列、カート合計など)を選択してください。
- コンテンツタブのデータセクションで、必要に応じてコントローラーの操作を変更します。
- 変更を保存するには「 保存 」をクリックしてください。
メールメッセージでレンダリングするためのCommerceデータを取得する
CommerceのメールメッセージがストアフロントからCommerceデータを取得するためには、以下のコントローラーコードを追加する必要があります。
public ActionResult OrderHeader() { EmailOrderModel model = null; string renderingViewPath = string.Empty; var visitorContext = Foundation.Connect.VisitorContext.Current;
// This code sets up the context for the Commerce site and user if the Sitecore and contact // information are present based on the query parameters.
using (var commerceSiteContext = new SetupCommerceSiteContext(visitorContext))
{
var linkRepository = ServiceLocator.ServiceProvider.GetService
// This code calls the base GetRenderingView() controller method, which supports the SXA view // override feature.
renderingViewPath = GetRenderingView("EmailOrderHeader"); } return View(renderingViewPath, model); }
!注SXAビューの詳細については、「 サイトごとのHTMLレンダリングカスタマイズ」をご覧ください。
リポジトリメソッドコードは、SetupCommerceSiteContextコンテキストスイッチ内のコントローラーから呼び出しられ、提供されたクエリパラメータに基づいてSitecoreサイトと現在ログイン中のユーザーを設定します。
public virtual EmailOrderModel GetOrder(SetupCommerceSiteContext commerceSiteContext) { var orderId = string.Empty;
// This code looks for the order_id query parameter and, if specified, retrieves the model for // a specific order.
if (Sitecore.Modules.EmailCampaign.Core.ExmContext.QueryString != null)
{
orderId = Sitecore.Modules.EmailCampaign.Core.ExmContext.QueryString"order_id";
}
var model = ModelProvider.GetModel
// This code verifies if the user context was switched to a valid user. If the context was // switched, the order is retrieved using the Storefront foundation code.
if (commerceSiteContext.HasSwitchedUsers)
{
var storefrontContext = ServiceLocator.ServiceProvider.GetService
// This code caches the returned order on the site context items collection. To avoid // retrieving the same order multiple times when an email has multiple renderings using the // same model (called from within the same HttpContext), the order is retrieved once and // cached so all other calls retrieve the order from the cache. The site context item // collection is emptied at the end of the HttpRequest.
if (SiteContext.ItemsOrderModelKey != null)
{
order = (Engine.Connect.Entities.CommerceOrder)SiteContext.ItemsOrderModelKey;
}
else
{
var orderManager = ServiceLocator.ServiceProvider.GetService
cshtmlビューをレンダリングするには、以下のメールオーダーヘッダービューが必要です。
@using System.Web.Mvc.Ajax @using System.Web.Mvc.Html @using Sitecore.XA.Foundation.SitecoreExtensions.Extensions @using Sitecore.Commerce.XA.Foundation.Common.ExtensionMethods @using Sitecore.Mvc @using Sitecore.Commerce.XA.Feature.Emails @using Sitecore.Commerce.XA.Feature.Emails.Models @using System.Linq @model EmailOrderModel @{ var orderInformationLabel = Html.Sitecore().Field(Constants.Templates.EmailOrderHeader.FieldNames.OrderInformationLabel, Html.Sitecore().CurrentItem);
// This code retrieves the labels from the item data source. These are the values retrieved // from the template.
var orderDateLabel = Html.Sitecore().Field(Constants.Templates.EmailOrderHeader.FieldNames.OrderDateLabel, Html.Sitecore().CurrentItem); var orderIdLabel = Html.Sitecore().Field(Constants.Templates.EmailOrderHeader.FieldNames.OrderIdLabel, Html.Sitecore().CurrentItem); var orderStatusLabel = Html.Sitecore().Field(Constants.Templates.EmailOrderHeader.FieldNames.OrderStatusLabel, Html.Sitecore().CurrentItem); var deliveryAddressLabel = Html.Sitecore().Field(Constants.Templates.EmailOrderHeader.FieldNames.OrderDeliveryAddressLabel, Html.Sitecore().CurrentItem); var billingAddressLabel = Html.Sitecore().Field(Constants.Templates.EmailOrderHeader.FieldNames.OrderBillingAddressLabel, Html.Sitecore().CurrentItem); }
// This code specifies the CSS for this view. Each view must define its own embedded // CSS unlike standard web pages. The rest of the view (.cshtml file) retrieves the data from // the EmailOrderModel.
@Model.RenderingMessage
}
else
{
@orderInformationLabel
@billingAddressLabel
@deliveryAddressLabel
メールブランチテンプレートのレンダリングを作成します
各メールタイプには分岐テンプレートがあります。新たに注文されたメールには以下の分岐があります:
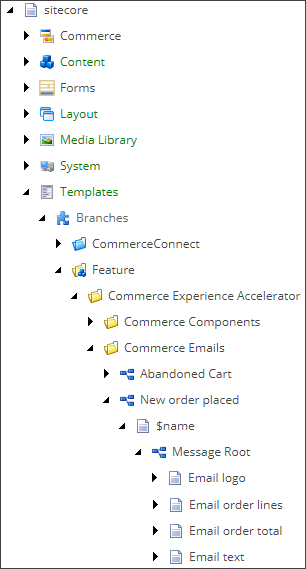
以下の手順は、既存のオーダーヘッダーがブランチテンプレートに新たに配置されたブランチに追加された方法を説明します。この手順はどのブランチテンプレートでも同じです。
新しいレンダリングを「新しい順序の配置」分岐テンプレートに追加するには:
-
コンテンツエディターで、sitecore/テンプレート/branch/feature/Commerce Experience Accelerator/Commerce Emails/新規注文の順に行ってください。
-
メッセージルートを右クリックし、「Insert」→「Insert」→「Insert from Template」をクリックします。
-
テンプレート/機能/コマース体験アクセラレーター/メール/注文/メールオーダーヘッダーに行き、アイテム名欄にメールオーダーヘッダーを入力して挿入をクリックします。
-
コンテンツツリーで「新しい注文された」ブランチの 「メッセージルート 」をクリックしてください。
-
リボンの上で「 プレゼンテーション 」タブをクリックし、「 レイアウト 」セクションで 「詳細」をクリックしてください。
-
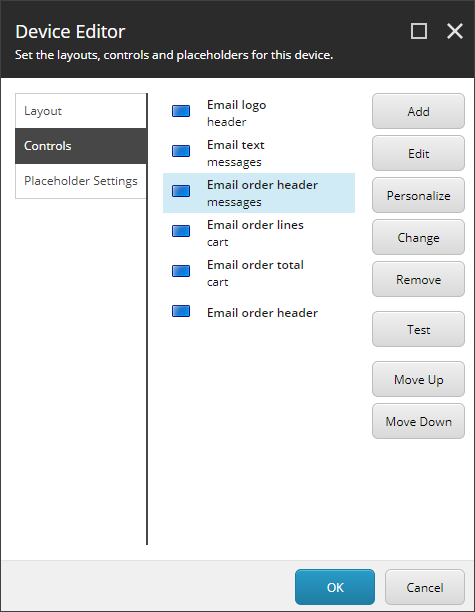
デフォルトセクションで編集をクリックし、デバイスエディターのダイアログボックスでコントロールタブをクリックします。
-
追加をクリックして、レンダリング/フィーチャー/コマース体験アクセラレーター/コマースメール/メールオーダー/メールオーダーヘッダーに行き、「選択」をクリックします。
-
メールオーダーヘッダーを選択し、編集をクリックします。
-
コントロールプロパティのダイアログボックスの**「一般**」セクションで、「データソースの下の**ブラウズ」**をクリックし、メッセージのルートへ移動します。メール注文ヘッダー項目を選択し、OKをクリックします。
-
コントロールプロパティのダイアログボックスでOKをクリックし、デバイスエディターのダイアログボックスでOKをクリックします。
メールオーダーヘッダーコントローラーとそのデータソースはメールメッセージの一部となります。新たに注文したメールメッセージが作成されると、レンダリングも含まれます。