Copy and customize a rendering
With SXA, you can quickly create a copy of an SXA rendering by using the clone script. With a cloned rendering, you have an exact copy of the rendering definition item, rendering parameters template, data source templates, and branches. You copy the existing rendering, and you name and style it differently. This can be convenient, for example, when you want many Promo renderings that are all styled differently.
Because the standard SXA toolbox sections are overwritten with SXA updates, we recommend that you create a separate toolbox section for derivative renderings. You can do this by adding a new module to SXA.
Add a new module
Add a new module
To add a new module:
-
Navigate to /sitecore/system/Settings, right-click Features or Foundation, and insert a new folder.
-
Right-click the new folder, click Insert, and click Module.
-
Enter a name and group the module under the new folder.
Copy and customize a rendering
Copy and customize a rendering
To copy and customize a rendering:
-
To clone the rendering that you want to use, navigate to /sitecore/Layout/Renderings/ and right-click the rendering that you want to clone.
-
Click Scripts, and click Clone Rendering.
-
In the Create derivative rendering dialog box, fill in the following fields:
|
Tab |
Field |
Description |
|---|---|---|
|
General |
New rendering name |
Enter the name for the new rendering. |
|
Add to module |
Select the module the new rendering belongs to. Because the standard SXA toolbox sections are overwritten with SXA updates, we recommend that you add your own module for derivative renderings. | |
|
Rendering CSS class |
Enter the CSS class for the rendering. | |
|
Parameters |
Rendering Parameters |
Select the rendering parameters copy mode:
|
|
Datasource |
Datasource |
Select the data source copy mode:
|
|
View |
View |
Select the view copy mode:
|
|
Path to rendering view |
Enter the location of the view. For example: 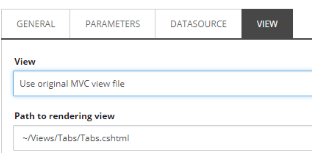 |
Now you can add the rendering to appear in the toolbox in your site.
Add a rendering to the toolbox
Add a rendering to the toolbox
To add the rendering to the toolbox:
-
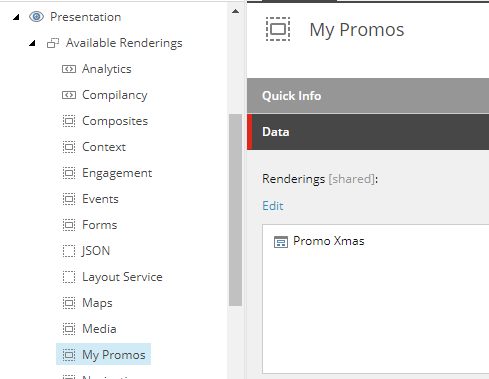
Navigate to the Presentation folder of your site and right-click Available Renderings.
-
Click Insert and click Available Renderings.
-
Enter the section name for the rendering that you want to add and click OK.
-
Click the new section that you just created, and in the Data section, click Edit.
-
In the Select Item dialog box, in the Renderings folder, click the relevant rendering, and click the right arrow to move it to the list of selected items. Click OK.
Your new rendering is now available for use in the Experience Editor.
