Publish an item to your website
When you are ready to publish an item to your website, you can run the publishing wizard, which guides you through the steps of publishing in Sitecore. You can run the publishing wizard from the Content Editor and the Experience Editor.
If you publish a new child item individually, the associated parent item must be published first.
Logging
Before you publish, you can set up a verbose logging process for troubleshooting, to understand which items got published and why.
To enable logging for every item version that is published, create a patch file that uses the traceToLog setting in the UpdateStatistics processor of the publishItem pipeline:
When traceToLog is set to true, publishing information is logged and available in the log file.
An example log record:
These are the available log details:
-
Operation- the publish action taken on a publishing candidate (target item). Possible values areskip,update,create, ordelete. -
ChildAction- the publish action taken on child items. Possible values areskip,allow, orforce. -
Explanation- a description of the publishing status, such as whether an item was published and some details.
Publish an item
To publish a single item:
-
Open the Publish Item wizard from one of two locations in Sitecore:
-
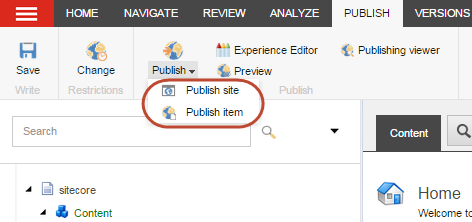
From the Content Editor – select the item that you want to publish. On the Publish tab, in the Publish group, click the Publish drop-down arrow, and select Publish item.
NoteTo publish the selected item in all languages to all publishing targets and avoid going through the steps of the publishing wizard, click Publish
 .
.-
From the Experience Editor – navigate to the page that you want to publish, and on the Home tab, in the Publish group, click Publish.

-
-
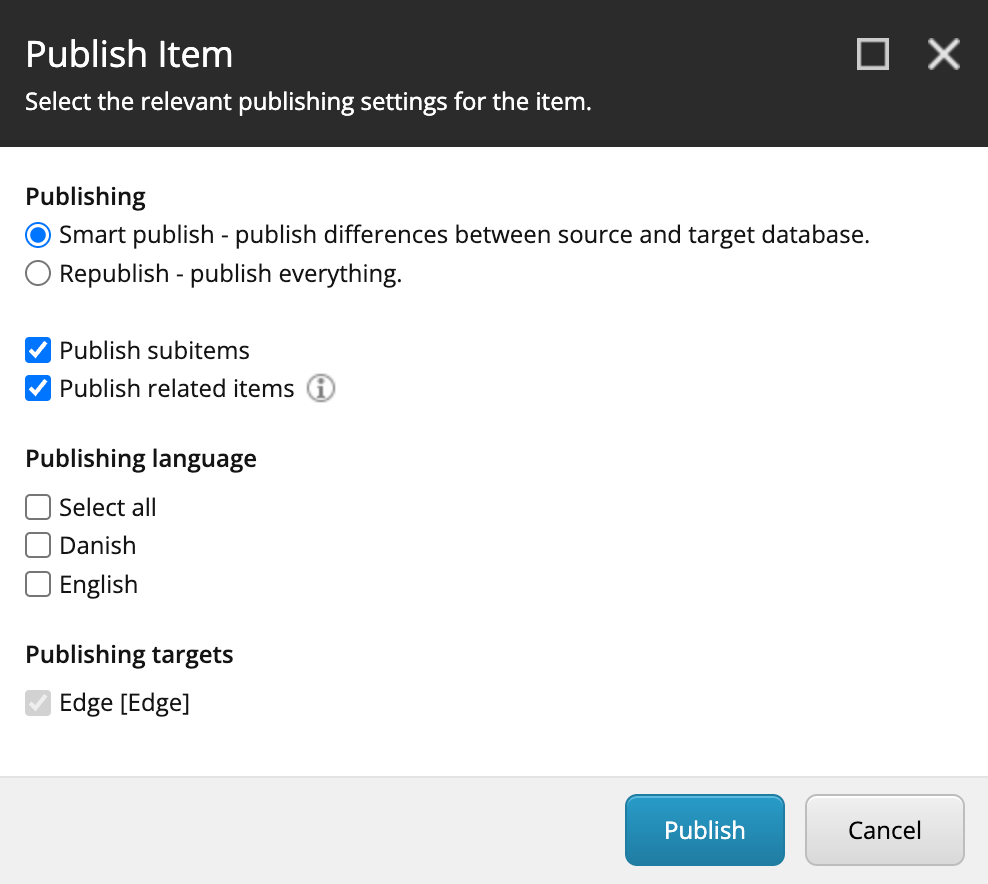
In the Publish Item wizard, on the Settings page, specify the publishing mode:
-
Smart publish – publishes the selected item if it has changed since the last publication. When you run Smart Publish, the selected item in the Master database is compared with the equivalent item in the target database and, if the item has changed, it is published. When you are publishing single items, Smart Publish is a quick way to make sure that all changes to a specific item and its subitems are published.
-
Republish – publishes everything. Republish overwrites the selected item in the target database with the equivalent item from the Master database – even if it has not changed. In this way, all obsolete versions are removed from the target database. You can use republishing to restore a backup of the master database and to add a new content language, a new publishing target, or other system items.
-
-
To publish all the subitems of the selected item, select Publish subitems.
-
To publish all the related items to the selected item, select Publish related items. It is generally recommended that you select this option. Related items can be:
-
Clones – items that are clones of the selected item.
-
Media items – media items that are referenced by the selected item.
-
Content items - data sources that are referenced by the selected item.
-
Design items - renderings, layouts and templates used by the selected item.
-
Aliases – items that are aliases of the selected item.
NoteBy default, the publishing mechanism uses the deep scan approach for identifying which items to publish.
-
-
In the Publishing language section, specify the language versions that you want publish.
-
In the Publishing targets section, specify where you want to publish the items to.
NoteIf you do not specify a publishing target, the item is published to all the publishing targets.
-
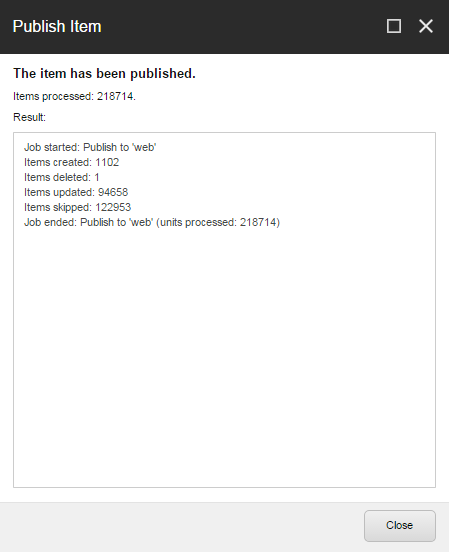
Click Publish. When the publishing completes, you can see how many items were processed during publishing and the number of items that were created, deleted, or updated on the target database.