Rebuild the xDB index in Azure Search
You rebuild an xDB index if:
-
You want to change an index name.
-
You want to change the amount of data to be indexed.
-
The current index token has expired.
-
You want to upgrade or downgrade your Azure Search subscription.
Before you start rebuilding indexes, familiarize yourself with the Azure Search and xConnect Search Indexer conventions because configuration options change depending on where your Sitecore instances are hosted.
Azure Search and xConnect Search Indexer conventions
Azure Search and xConnect Search Indexer conventions
In Azure Search, a core is an index, and Azure Search uses two indexes: a primary and a secondary. At any time, one index is active and used for search and indexing of live data, while the other is passive and used for maintenance operations such as rebuilding.
The names of the primary and secondary indexes are linked like this:
-
The default name of the xDB primary index is
xdb. -
The default name of the xDB secondary index is
<PRIMARY INDEX>-secondary(making itxdb-secondary).
By default, xConnect Search Indexer addresses both the primary and the secondary indexes through the xDB Index collection.search connection string, but you can create a dedicated connection string for the secondary index.
At startup and at the beginning of each rebuild, the indexer uses connection strings to check the existence of the indexes. If an index is missing, the indexer creates it.
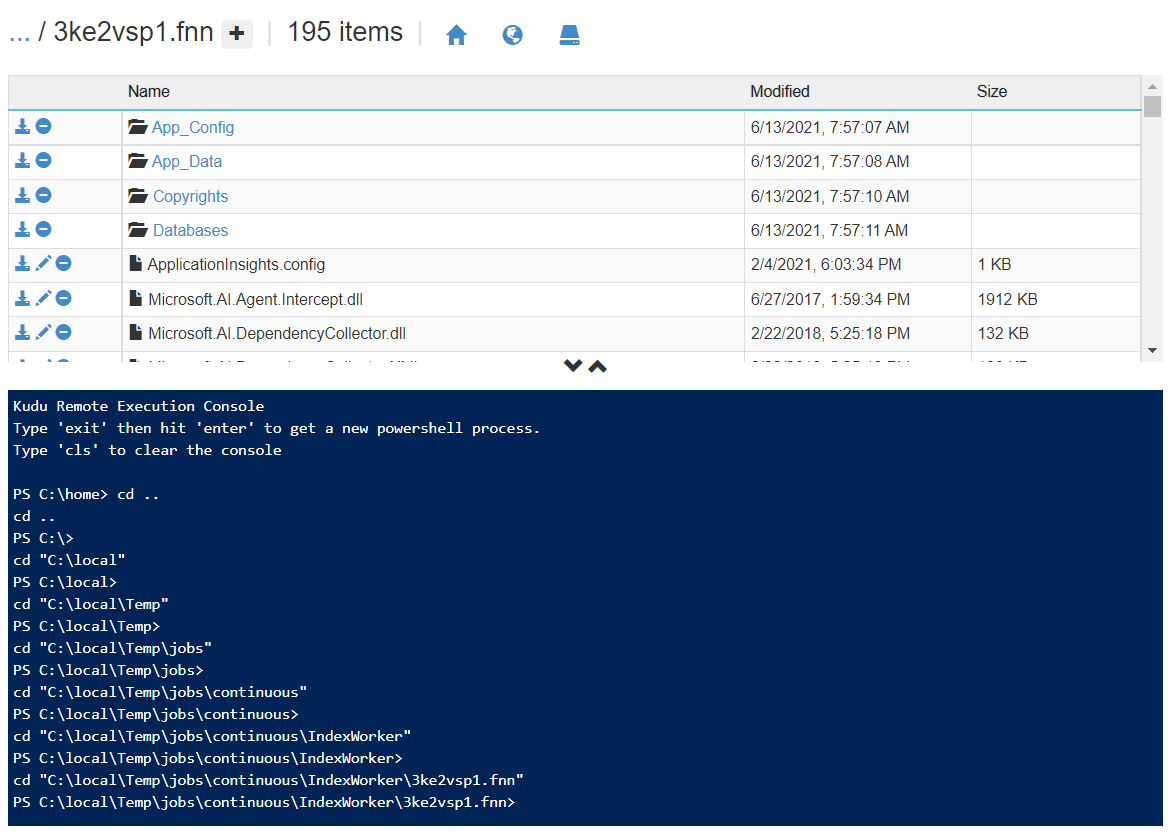
The indexer changes process type, access way, and working folder depending on where it is hosted:
|
Sitecore hosted on-prem |
Sitecore hosted in cloud | |
|---|---|---|
|
Process type |
A Windows service on the xConnect Collection Search instance. |
An Azure App Service WebJob on the xConnect Collection Search instance. |
|
Access way |
PowerShell. |
The Kudu debug console. |
|
<WORKING> folder |
|
Each time Azure redeploys the WebJob, it creates a uniquely named temporary subfolder, for example |
Rebuild the primary and secondary indexes to a different name and/or Azure Search subscription
Rebuild the primary and secondary indexes to a different name and/or Azure Search subscription
To rebuild the primary and secondary indexes to a different name and/or Azure Search subscription:
-
Go to the
<xConnect instance>\App_Config\folder and open theConnectionStrings.configfile. -
In the
collection.searchconnection string, edit your index name and/or your API key:-
<CONNECTION STRING NAME>is the name of the connection string. Do not edit this. -
<SUBDOMAIN>is your subdomain onsearch.windows.net. Do not edit this. -
<INDEX NAME>can be the default primary index name or something else. You can choose what you want to call it. -
<API KEY>is your Azure Search subscription key. If you are changing your Azure Search subscription, use the API key of your new Azure Search subscription.
-
-
Repeat the procedure on all your xConnect Collection Search instances.
-
If you have changed your Azure Search subscription, when you have finished repeating the above procedure:
-
Make sure no instances are referencing your old Azure Search subscription.
-
Delete your old Azure Search subscription with your old indexes.
-
Rebuild a single index to a different name and/or Azure Search subscription
Rebuild a single index to a different name and/or Azure Search subscription
To rebuild a single index to a different name and/or Azure Search subscription:
-
Create a dedicated secondary index connection string if you do not have one.
-
In the connection string of the index you want to rebuild, edit your index name and/or your API key:
-
<CONNECTION STRING NAME>is the name of the connection string. Do not edit this. -
<SUBDOMAIN>is your subdomain onsearch.windows.net. Do not edit this. -
<INDEX NAME>can be the default index name or something else. You can choose what you want to call it. -
<API KEY>is your Azure Search subscription key. If you are changing your Azure Search subscription, use the API key of your new Azure Search subscription.
-
-
Rebuild the index.
-
If you have changed your Azure Search subscription, and you want both your indexes to exist in the same Azure Search subscription, you must:
-
Wait for the rebuild to complete.
-
Wait for the rebuilt index to become active.
-
Change the API key of the passive index connection string.
Now the passive index is rebuilt in your new Azure Search subscription.
-
-
Repeat the procedure on all your xConnect Collection Search instances.
-
If you have changed your Azure Search subscription and none of your indexes exist in your old Azure Search subscription, when you are finished repeating the procedure:
-
Make sure no instances are referencing your old Azure Search subscription.
-
Delete your old Azure Search subscription with your old indexes.
-
Rebuild an index
Rebuild an index
To rebuild an index:
-
Access the xConnect Search Collection instance.
-
Go to the <WORKING> folder.
-
Start the rebuild:
.\XConnectSearchIndexer.exe -rrImportantIf you are hosting your Sitecore instances in the cloud, do not start the rebuild from the
<WORKING>\App_Data\Logs\folder. This can cause Azure to redeploy the indexer WebJob, which in turn can interrupt the index rebuild process.
The indexer returns Done to indicate that the rebuild has begun. When the rebuild has completed, the newly rebuilt index automatically becomes active, and the other index becomes passive.
If you rebuild an index to remove Personally Identifying Information, you must delete the passive index after the rebuild has completed, and the active and passive indexes have been swapped.
To save space, you can delete deprecated index data from the passive index.
Check if an index is active
Check if an index is active
To check if an index is active:
-
Open the index in Azure Search.
-
Perform this search:
$filter=id eq 'indexconfiguration'&$select=id,isactivecore -
If the
IsActiveCorefield istrue, the index is active.
Check if a rebuild has completed
Check if a rebuild has completed
You can check if a rebuild has completed in the following ways:
-
Go to the
<WORKING>\App_Data\Logs\folder and search the log files. If you find aRebuilding process. Stage: Finishedtext, then the rebuild has completed.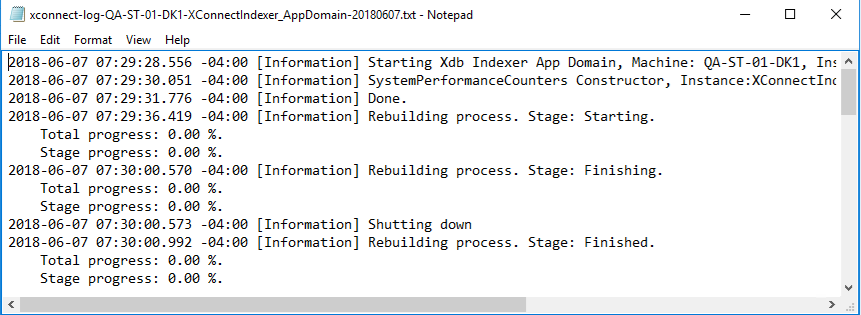
-
Open the index in Azure Search and check the status of the
xdb-rebuild-statusdocument with the$filter=id eq 'xdb-rebuild-status'&$select=id,rebuildstatecommand.The
Index Rebuild State statusdocument can have the following values:-
0= Default -
1= RebuildRequested -
2= Starting -
3= RebuildingExistingData -
4= RebuildingIncomingChanges -
5= Finishing -
6= Finished
-
Create a dedicated connection string for the secondary index
Create a dedicated connection string for the secondary index
To create a dedicated connection string for the secondary index:
-
Go to the
<xConnect instance>\App_Data\config\global\folder. -
Create a patch file named, for example,
xDbSecondaryIndexConnectionString.configfile. -
In the patch file, enter the following to create a secondary index connection string called, for example,
collection.search.secondary. You can choose to call it whatever you want: -
Go to the
<xConnect instance>\App_Config\folder and open theConnectionStrings.configfile. -
In the configuration file, add a secondary connection string with your connection string name, your subdomain, your index name, and your API key:
-
<CONNECTION STRING NAME>is the name you chose in the patch file. -
<SUBDOMAIN>is your subdomain onsearch.windows.net. -
<INDEX NAME>can be the default index name or something else. You can choose what you want to call it. -
<API KEY>is your Azure Search subscription key. If you are changing your Azure Search subscription, use the API key of your new Azure Search subscription.
-
-
Save the patch file.
Refresh the content of a 9.0 Initial Release and 9.0 Update 1 index
Refresh the content of a 9.0 Initial Release and 9.0 Update 1 index
There is no index rebuild process available for Azure Search between Sitecore 9.0 Initial Release and 9.0 Update 1. However, you can use this procedure to refresh the content of the index:
-
Stop the indexer WebJob.
-
Delete the index.
-
Start the indexer.
This procedure recreates the index and adds data that has changed within the last five days (the default retention period in SQL). Data older than the value of the retention period must not be added to the index. The process relies on the xDB Collection provider change tracking retention period being high enough to maintain a record of all incoming changes until the indexer has processed all existing data. Setting a very high change tracking retention period has detrimental effects on performance.