Walkthrough: Creating a login page
This topic describes how to create a form page that enables visitors to log in and out on an extranet. This walkthrough is part two of the Prefilling forms series. To execute the steps of this walkthrough, you must first complete the Walkthrough: Creating a register page.
This walkthrough describes how to
-
Create a login and logout submit action class
-
Create a login action editor control
-
Create the login submit action item
-
Create the logout submit action item
-
Create a login form
-
Create a logout form
-
Add the form to a webpage
Create a login and logout submit action class
Create a login and logout submit action class
To create the login and logout submit action class:
-
In your Visual Studio Project, go to
SubmitActionsfolder. Create a folder namedLoginUser. -
In the
LoginUserfolder, create aLoginUserDataclass: -
Create a
LoginUserclass: -
Go to the
SubmitActionsfolder and add a folder namedLogoutUser. In that folder, create theLogoutUserclass:
Create a login action editor control
Create a login action editor control
The next step is to create a LoginUser action editor to map the form fields to theLoginUserData class.
To complete this task, you must have the Sitecore Rocks Visual Studio plugin. The plugin is compatible with Visual Studio 2019 or earlier.
To create the LoginUser action editor control:
-
Create the JavaScript file for the action editor. In Visual Studio, navigate to the scripts folder and create a JavaScript file named
LoginUser.js. -
Copy the following script to the file:
-
Deploy
LoginUser.jsto your website folder at:YourInstance/Website/sitecore/shell/client/Applications/FormsBuilder/Layouts/Action. -
In Sitecore Rocks, expand the core database and go to:
/sitecore/shell/client/Applications/FormsBuilder/Layouts/Actions. -
Click Add, and click New item.
-
In the Add New Item dialog box, search for and click the
Speak-BasePagetemplate, enter the name: LoginUser. -
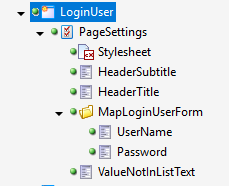
Update the layout of this item to
/sitecore/client/Speak/Layouts/Layouts/Speak-FlexLayoutand add the following renderings:-
PageCode
-
HeaderTitle
-
HeaderSubtitle
-
ValueNotinListText
-
MainBorder
-
MapLoginUserForm
-
-
Open the properties window of the PageCode rendering and update the
PageCodeScriptFileNameto:/sitecore/shell/client/Applications/FormsBuilder/Layouts/Actions/LoginUser.js -
Add the parameters based on the templates for the renderings that you have added:
Item
Template
Stylesheet
Page-Stylesheet-File
HeaderTitle
Text Parameters
HeaderSubtitle
Text Parameters
MapLoginUserForm
Folder
UserName
FormDropList Parameters
Password
FormDropList Parameters
ValueNotInListText
Text Parameters
-
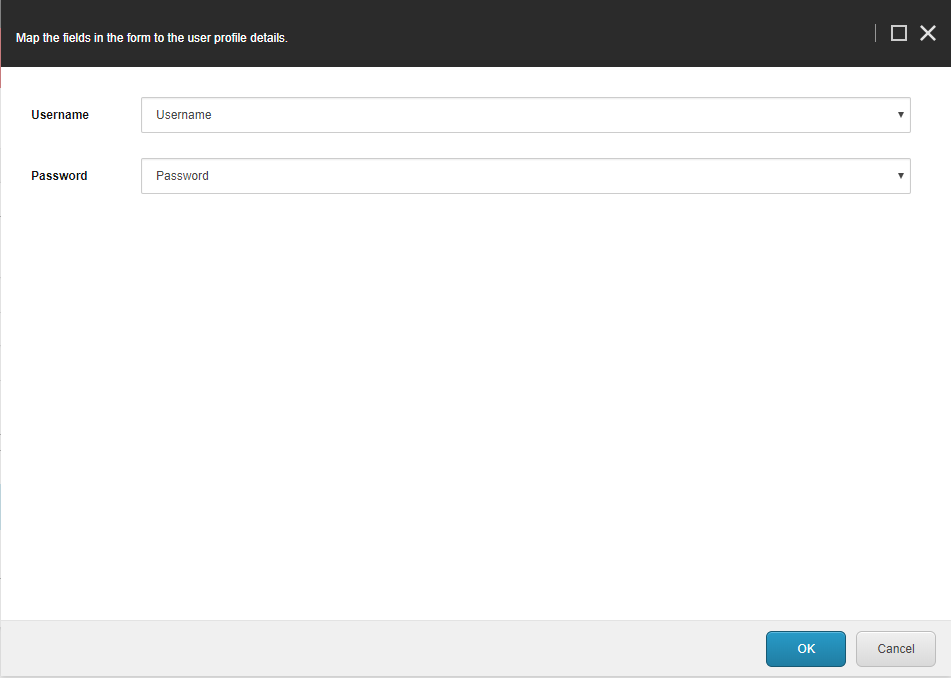
Update their fields with the following values:
Parameter
Field:Values
StylesheetStylesheet:
/sitecore/shell/client/Applications/FormsBuilder/Layouts/Actions/Actions.cssHeaderTitleIsVisible: deselect
Text: Map the fields in the form to the user profile details.
HeaderSubtitleIsVisible: deselected
Text: Map the fields in the form to the user profile details.
UserNameValueFieldName: itemId
DisplayFieldName: name
Form Label: Username
BindingConfiguration: userNameFieldId / SelectedValue
PasswordValueFieldName: itemId
DisplayFieldName: name
Form Label: Password
BindingConfiguration: passwordFieldId / SelectedValue
ValueNotInListTextIsVisible: deselected
Text: Value not in the selection list
Create the login submit action item
Create the login submit action item
To create the login submit action item:
-
In the Content Editor, go to /system/Settings/Forms/Submit Actions, insert a
Submit Actionitem, and name it Login User. -
Update the fields with the following values:
Field
Value
Model Type
ValueProviderSample.SubmitActions.LoginUser
Error Message
Login failed!
Editor
LoginUser
Create the logout submit action item
Create the logout submit action item
To create the logout submit action item:
-
Insert a submit action item to the
Submit Actionsfolder and name it Logout User. -
Update the fields with the following values:
Field
Value
Model Type
ValueProviderSample.SubmitActions.LogoutUser
Error Message
Logout failed!
NoteDo not forget to save the items.
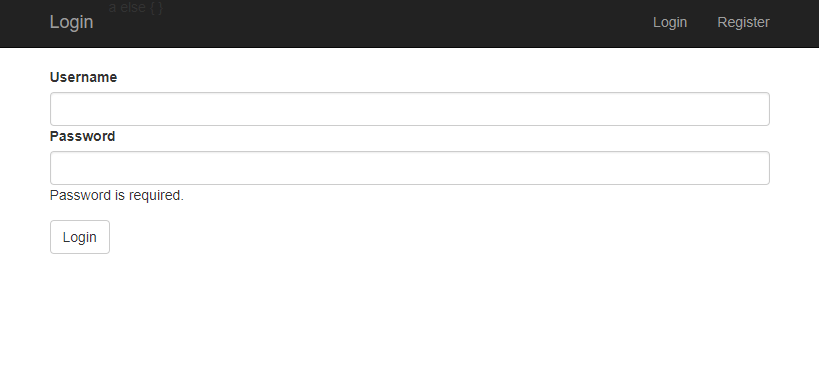
Create a login form
Create a login form
To create the login form:
-
Open the Sitecore Forms application from the Sitecore Launchpad.
-
Create a form and add the following sections:
Section name
Css class
LoginSection
form-group col-md-6SubmitSection
form-group col-md-12 -
Add the following fields:
Type
Label
Field name
Section
Single-line text
Username
Username
LoginSection
Password
Password
Password
LoginSection
Submit button
Login
Login
SubmitSection
-
Add the Login User submit action to the Login button. Map the form fields accordingly. Then click OK.
-
Save the form and name it Login Form.
Create a logout form
Create a logout form
To create a logout form:
-
Create a blank form.
-
From the Form Elements pane, drag the submit button to the page.
-
Edit the submit button properties with the following values:
-
Label: Logout
-
Field name: Submit Button
-
CSS class: btn btn-link
-
-
In the Submit actions section, add the Logout User submit action.
-
Save the form with name Logout Form.
Add the form to a webpage
Add the form to a webpage
With the Sitecore Forms application, you can easily create a new form or use a template. You can insert your form in a webpage in both the Content Editor and the Experience Editor. First, you must replace the default sample layout with the MVC layout and then you can insert your form in a webpage.
To add a form to a webpage:
-
Navigate to sitecore/Content/Home, and insert a Sample Item. Name it Login.
-
Change the
Loginitem's default layout to MVC Layout (the MVC layout you created in the previous walkthrough. -
Remove all the sample controls and add the MVC form renderings. Add it to the main placeholder.
-
Edit the MVC form rendering you just added, and update its Data Source to Login Form.
-
Save and publish the items.
You can now view your login page. Go the next walkthrough to learn how to set up a value provider.