Walkthrough: Installing SFMC Behavioral Data Exchange Sitecore Sync on-prem
The Salesforce Marketing Cloud (SFMC) Activity for Sitecore Sync enables you to synchronize xConnect contact status from SFMC to Sitecore using a custom Journey Builder activity.
When a contact enters the custom Journey Builder activity, it triggers the synchronization.
This walkthrough shows how you install the connector.
Before you install SFMC Activity for Sitecore Sync, you must install the following packages in sequence:
-
Sitecore Experience Platform 10.3
-
Data Exchange Framework (DEF) 8.0
-
Sitecore Connect for Salesforce Marketing Cloud - Behavioral Data Exchange (SFMC) 8.0
-
DEF Tenant Web Service 8.0
ImportantYou must deploy this service as a separate IIS site.
Before you set up an SFMC to Sitecore sync activity, you must also perform the following actions from the SFMC Behavioral Data Exchange installation guide:
-
Create an SFMC tenant
-
Configure and test an SFMC endpoint
-
Test the xConnect endpoint
-
Run the pipeline batch that creates the required data folders
This walkthrough describes how to:
-
Install the SFMC Activity for Sitecore Sync
-
Deploy the xConnect Collection Model
-
Install predicates for Marketing Automation
Install the SFMC Activity for Sitecore Sync
Install the SFMC Activity for Sitecore Sync
To install the Salesforce Marketing Cloud (SFMC) Activity for Sitecore Sync Developer:
-
Download the Sitecore Connect for Salesforce Marketing Cloud-BDE Plugin for Tenant Service 8.0.0.scwdp.zip package.
-
Deploy the package on top of the Tenant Service server.
-
Verify that the
<tenant service>\binfolder contains all the DLL files from the package. -
Verify that the
<tenant service>\sync-activityfolder and all its contents is available on the installation.
Deploy xConnect Collection Model
Deploy xConnect Collection Model
Sitecore Connect adds new facets to associate information from Salesforce with Sitecore contacts and interactions. To use these facets, you must deploy a collection model that creates these new facets to xConnect.
To deploy the xConnect collection model:
-
In Sitecore, open the Content Editor.
-
Navigate to
/sitecore/system/Settings/Data Exchange/Providers/xConnect/Collection Models/Salesforce Marketing Cloud/SFMC Collection Model.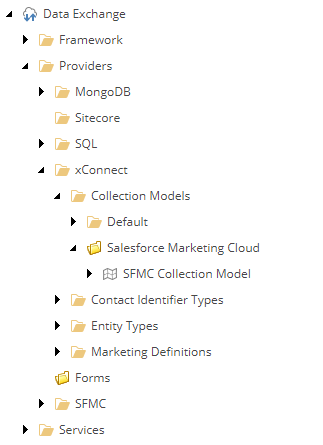
-
On the menu ribbon, click Convert Model to JSON.
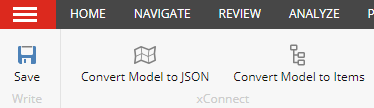
-
Your browser downloads a JSON file. Save this file to your local machine.
-
Deploy the JSON file to your xConnect Collection server, in the
\App_Data\Modelsfolder. -
Deploy the JSON file to your xConnect indexing server. You must copy the JSON file to two folders:
-
\App_Data\Models\ -
\App_Data\jobs\continuous\IndexWorker\App_Data\Models\
-
For more information on how to deploy a custom collection model to xConnect, see the xConnect developer documentation.
Install predicates for Marketing Automation
Install predicates for Marketing Automation
To view Salesforce rules in Marketing Automation (MA) you must install predicates for MA.
To install predicates:
-
Download the
Sitecore Connect for Salesforce Marketing Cloud-BDE Marketing Automation 8.0.0 scwdp.zippackage from the Sitecore download page. -
Deploy the package on top of your xConnect Marketing Automation Service.
-
Navigate to the
sitecore_xconnect\App_data\continuous\AutomationEngine\App_Data\config\sitecore\MarketingAutomationfolder. -
Open the
sc.MarketingAutomation.Contactloader.xmlfile. In theMarketingAutomation.Loading.ContactFacetsConfiguratornode, add the following:
If you are on an XP scaled instance of Sitecore, you must also perform the following steps:
-
Copy the
Sitecore.DataExchange.XConnect.SalesforceMarketingCloud.dllfile from thecm\binfolder to thecd\binfolder. -
Copy the following two files from the
App_Config\Sitecore\DataExchange\SalesforceMarketingCloudfolder on your content management server to the same folder on your content delivery server:-
Sitecore.XConnect.Client.config -
Sitecore.DataExchange.SalesforceMarketingCloud.Tracker.config
-