Update Managed Cloud
Managed Cloud Containers lets you install the MCC package with the latest updates. This is an important process for keeping an implementation current with the latest advances for Managed Cloud Containers. We recommend that you plan these updates as part of your regular maintenance plans and, for example, schedule time for MCC updates monthly.
To learn more about the content of an update package, refer to the release notes. The release notes for every package are available from the same location as the upgrade package (release_notes.<mcc package version>.md).
Sitecore Managed Cloud Containers solution can be updated only if it supports a modularized repository structure. Modularized structure is supported starting from versions 10.1.0-r.182868 and 10.1.1-r.182925. To check your version, go to the Application repository and check the version of your version.txt file. If you have an earlier version, you must follow the migration process. If you have the solution.json file, your environment already uses a modularized structure and you can continue the upgrade process described in this topic.
To update your Managed Cloud solution, you must first prepare the update, update the infrastructure, then update the application.
This topic describes how to:
Prepare the update
To prepare the update:
-
Go to the
mccsharedupgradestoragestorage account, open themcc-upgradescontainer, and find the latest revision for your topology and Sitecore version:- mcc.{topology}.upgrade.{sitecore_version}-r.{revision}.nupkgNoteIf you cannot access the storage account, open a service request for DevOps Engineer access.
-
Download and unzip the package to a temporary folder.
-
Review your repositories and look for the customizations you have made:
-
If you want to add new Azure resources, follow the procedure described in the Configure Managed Cloud topic in the Add a new infrastructure module section.
-
For customized files in the Application repository: move the custom files to separate Ansible roles. For example, if you added additional public services, follow the process described in the Add a public service topic. If you added monitoring extensions, read the Add a custom Prometheus alert topic and the Import and export your Grafana dashboard topic.
-
Update the infrastructure
How you update the infrastructure depends on whether your environment has disaster recovery (DR) and the type of disaster recovery.
If you have customized files, make sure that all custom changes are separated into different modules.
Update the infrastructure of an environment that does not have DR
Update the infrastructure of an environment that does not have DR
To update the infrastructure of an environment that does not have DR:
-
Create a feature branch and copy all content of the
Infrastructurefolder to theInfrastructurerepository except the following folder:-
config\resources
-
-
Create a pull request against the main branch. Review and resolve any conflicts.
-
Compare the
config\resources\resources.jsonandsku\resources.{topology-size}.jsonfiles. Updateconfig\resources\resources.jsonif there are any differences in the structure. -
If you have any other new files added to the pipelines folder, make sure you create a new pipeline in Azure DevOps and link it to the new pipeline
.yamlfile from the pipelines folder. See the pipelines documentation for details.
Update the infrastructure of an environment that has DR Basic Cold Standby
Update the infrastructure of an environment that has DR Basic Cold Standby
To update the infrastructure of an environment that has DR Basic Cold Standby:
-
Create a feature branch and copy all content of the
Infrastructurefolder to theInfrastructurerepository except the following folder:-
config\resources
-
-
Create a pull request against the main branch. Review and resolve any conflicts.
-
Compare
config\resources\resources.jsonandsku\resources.{topology-size}.jsonfiles. Updateconfig\resources\resources.jsonif there are any differences in the structure. -
Make sure that the following files contain the highlighted code:
-
The
/config/remote-mcc-modules/modules.jsonfile:
-
The
/pipelines/templates/infrastructure.yamlfile:
-
The
/main.tffile:
-
The
/pipelines/scripts/enable-tls-1dot2.ps1file: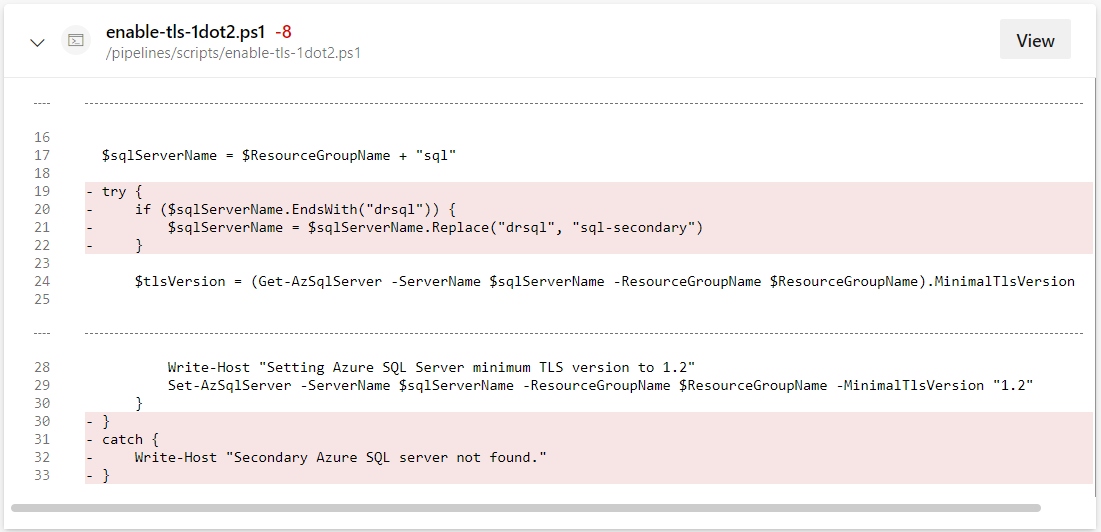
-
The
/pipelines/scripts/update-tags.ps1file:
-
The
/pipelines/update-resource-group-tags.yamlfile:
-
The
/pipelines/scripts/managed-identity-access.ps1file:
The
/pipelines/hadr/geosync/geosync.yamlfile:
-
-
Make sure that the
/pipelines/infrastructure.yamlfile contains the following highlighted code:WarningCheck the type of disaster recovery type you have deployed. DR Basic Cold Standby and DR Managed Hot Standby have different
/pipelines/infrastructure.yamlfiles. Make sure that you follow the example below that is based on the type of Disaster Recovery you have deployed.
-
Add the following snippet to the bottom of the
main_override.tffile (if the snippet is not already in the file).
-
If it doesn't already exist, add a new secret named
dr-sc-typewith a value ofexternal. -
Complete the pull request. The Infrastructure pipeline will run and apply the changes automatically.
-
Make sure that the infrastructure pipeline run finished successfully.
-
If you have any other new files added to the pipelines folder, make sure you create a new pipeline in Azure DevOps and link it to the new pipeline
.yamlfile from the pipelines folder. See the pipelines documentation for details.
Update the infrastructure of an environment that has DR Managed Hot Standby
Update the infrastructure of an environment that has DR Managed Hot Standby
To update the infrastructure of an environment that has DR Managed Hot Standby:
-
Create a feature branch and copy all content of the
Infrastructurefolder to theInfrastructurerepository except the following folder:-
config\resources
-
-
Create a pull request against the main branch. Review and resolve any conflicts.
-
Compare
config\resources\resources.jsonandsku\resources.{topology-size}.jsonfiles. Updateconfig\resources\resources.jsonif there are any differences in the structure. -
Make sure that the following files contain the highlighted code:
-
The
/config/remote-mcc-modules/modules.jsonfile: -
The
/pipelines/templates/infrastructure.yamlfile: -
The
/main.tffile: -
The
/pipelines/scripts/enable-tls-1dot2.ps1file:
-
The
/pipelines/scripts/update-tags.ps1file: -
The
/pipelines/update-resource-group-tags.yamlfile:
-
The
/pipelines/scripts/managed-identity-access.ps1file:The
/pipelines/hadr/geosync/geosync.yamlfile:
-
-
Make sure that the
/pipelines/infrastructure.yamlfile contains the following highlighted code:WarningCheck the type of disaster recovery type you have deployed. DR Basic Cold Standby and DR Managed Hot Standby have different
/pipelines/infrastructure.yamlfiles. Make sure that you follow the example below that is based on the type of Disaster Recovery you have deployed.
-
Add the following snippet to the bottom of the
main_override.tffile (if the snippet is not already in the file). -
Create a new Disaster Recovery cluster version upgrade
.yamlfile.To create a new DR cluster version upgrade yaml file, copy the following code snippet to a text editor and save the file as
dr-cluster-version-upgrade.yaml. Then add the yaml file to the infrastructure repository, in thepipelinesfolder.Refer to the following structure:
 Note
NoteIf the code has been removed, go back to the commit with these files in
mainand copy the highlighted code to the files on the feature branch. -
If it doesn't already exist, add a new secret named
dr-sc-typewith a value ofexternal. -
Complete the pull request. The Infrastructure pipeline will run and apply the changes automatically.
-
Make sure that the infrastructure pipeline run finished successfully.
-
Create a new pipeline named
dr cluster version upgrade, then link it to the.yamlfile you created in step 7 and disable continuous integration. See the pipelines documentation for details.
-
If you have any other new files added to the pipelines folder, make sure you create a new pipeline in Azure DevOps and link it to the new pipeline
.yamlfile from the pipelines folder. See the pipelines documentation for details.
Update the application
How you update the application depends on whether your environment has disaster recovery and the type of disaster recovery.
If you have customized files, make sure that all custom changes are separated into different modules.
Update the application of an environment that does not have DR
Update the application of an environment that does not have DR
To update the application of an environment that does not have DR:
-
Create a feature branch and copy all content of the Application folder to the Application repository except the following folder:
-
config\resources
-
-
Compare
config\resources\resources.jsonandsku\resources.{topology-size}.jsonfiles. Updateconfig\resources\resources.jsonif there are any differences in the structure. -
Create a pull request against the main branch. Review and resolve any conflicts.
-
If you have new files added to the pipelines folder, make sure you create a new pipeline in Azure DevOps and link it to the new pipeline (the yaml file from the pipelines folder). See the pipelines documentation for detail.
NoteIf you apply any patches, make sure that your patch scripts are not removed from the repository.
Update the application of an environment that has DR
Update the application of an environment that has DR
To update the application for an environment that has DR:
-
Create a feature branch and copy all content of the Application folder to the Application repository except the following folder:
-
config\resources
-
-
Compare
config\resources\resources.jsonandsku\resources.{topology-size}.jsonfiles. Updateconfig\resources\resources.jsonif there are any differences in the structure. -
Make sure that the following files contain the highlighted code:
-
The
/pipelines/templates/application.yamlfile:
-
The
/main.yamlfile:
NoteIf the code has been removed, go back to the commit with these files in
mainand copy the highlighted code to the files on the feature branch. -
-
Make sure that the
/pipelines/application.yamlfile contains the following highlighted code:WarningCheck the type of disaster recovery type you have deployed. DR Basic Cold Standby and DR Managed Hot Standby have different
/pipelines/application.yamlfiles. Make sure that you follow the example below that is based on the type of disaster recovery you have deployed.-
For DR Basic Cold Standby only:

-
For DR Managed Hot Standby only:

-
-
Create a pull request against the main branch. Review and resolve any conflicts.
-
Make sure that the application pipeline run finished successfully. The application pipeline runs and applies changes automatically.
-
If you have new files added to the pipelines folder, make sure you create a new pipeline in Azure DevOps and link it to the new pipeline (the yaml file from the pipelines folder). See the pipelines documentation for detail.
NoteIf you apply any patches, make sure that your patch scripts are not removed from the repository.
Revert an update
If you encountered an error during an update, made a mistake, or want to undo an update, you can revert the update and return to the original state.
To revert an update and return to the original state:
-
Revert the pull request for the Infrastructure repository and run Infrastructure and Frontdoor pipelines to apply changes.
-
Revert the pull request for the Application repository and run the Application pipeline to apply changes.