Manage brand context folders and files
After SitecoreAI generates a brand context, admins and owners can customize its folder and file structure to reflect information that is important to the organization.
In the file explorer, you can add folders to organize related brand information, for example by campaign, region, audience, or business unit. You can also add files to include information that was not available from the original source. This lets you extend the generated brand context with additional knowledge that chats and agents can use when relevant.
You can also rename or delete folders and files as your brand information changes.
To add or delete brand context folders and files, you must have an Organization Admin or Organization Owner role in Sitecore Cloud Portal.
Add a folder
Add a folder to organize related brand context files. For example, you might create a folder for a campaign, region, audience segment, business unit, or another category that is useful to your organization.
You can add folders inside other folders, up to three levels deep. After you reach the third level, you cannot add another folder inside it.
To add a folder:
-
In the top-right corner of the page, click Brand Context .
-
On the Brand context page, select the brand context where you want to add the folder.
-
In the file explorer, select where you want to add the folder.
-
Click Create, then select Folder.
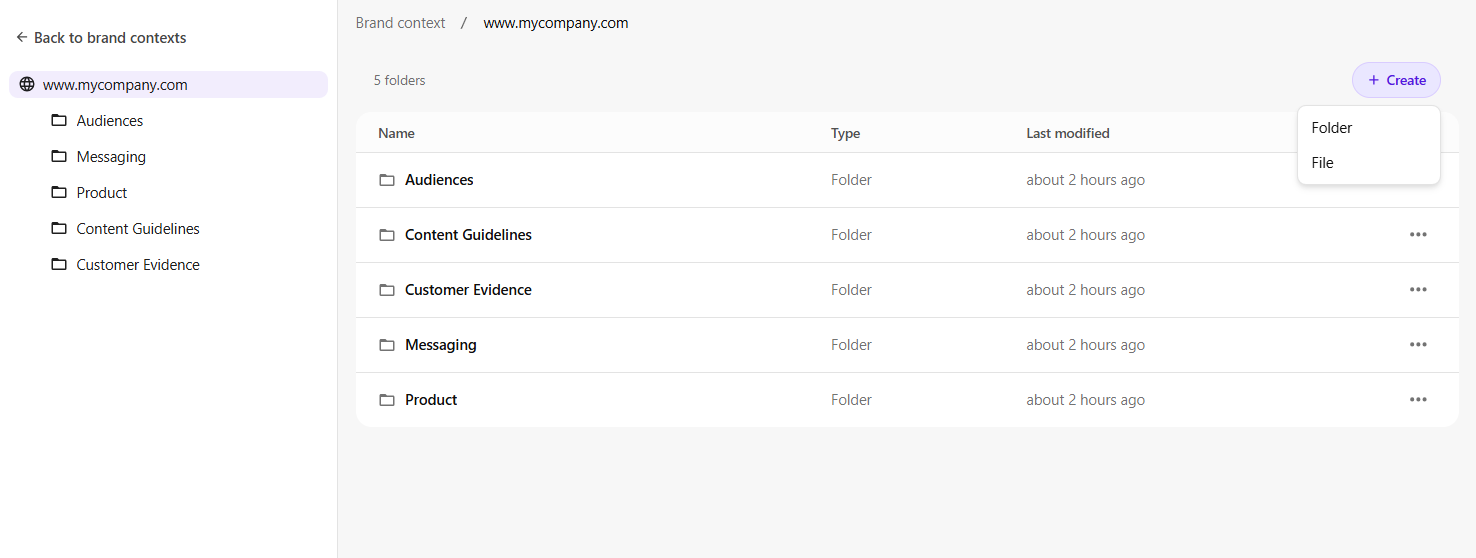
-
In the Create new folder dialog, enter a folder name.
-
Click Create folder.
The new folder is added to the selected location in the file explorer.
Add a file
Add a file to extend the brand context with information that was not generated from the original source, such as internal guidance, campaign information, regional details, or other brand knowledge.
To add a file:
- In the top-right corner of the page, click Brand Context .
- On the Brand context page, select the brand context where you want to add the file.
- In the file explorer, select the folder where you want to add the file.
- Click Create, then select File.
- In the Create new file dialog, enter a file name.
- Click Create.
- Edit the file as needed.
- Click Save.
The new file is added to the selected folder in the file explorer. This new information becomes part of the brand context. AI agents can use it in future supported workflows when it is relevant to the task.
Rename a folder or file
Rename a folder or file when its current name is unclear, outdated, or no longer reflects its contents.
To rename a folder or file:
- In the top-right corner of the page, click Brand Context .
- On the Brand context page, select the brand context that contains the folder or file you want to rename.
- In the file explorer, find the folder or file you want to rename.
- Next to the folder or file, click the horizontal ellipsis icon , then select Rename.
- In the dialog, enter a new folder or file name and then click Save.
Delete a folder
Delete a folder when it is outdated, duplicated, or no longer needed. Deleting a folder also deletes all its subfolders and files.
Deleting a folder is permanent and cannot be undone.
To delete a folder:
- In the top-right corner of the page, click Brand Context .
- On the Brand context page, select the brand context that contains the folder you want to delete.
- In the file explorer, find the folder you want to delete.
- Next to the folder, click the horizontal ellipsis icon , then select Delete.
- In the Folder deletion dialog, click Delete. The folder and any subfolders and files within this folder are also deleted.
Delete a file
Delete an individual file when its content is outdated, duplicated, or no longer needed.
Deleting a file is permanent and cannot be undone. To delete a file:
- In the top-right corner of the page, click Brand Context .
- On the Brand context page, select the brand context that contains the file you want to delete.
- In the file explorer, find the file you want to delete.
- Next to the file, click the horizontal ellipsis icon , then select Delete.
- In the File deletion dialog, click Delete.