Add values to a taxonomy
To configure Content Hub, you must either be a superuser or have the necessary permissions granted to you through user group policies.
A taxonomy contains values that you use to organize content into categories. Taxonomies have their own schema so you can extend them with additional properties, such as synonyms. Synonyms are multi-language string properties used in full-text search. In the following example, a search of the Brand taxonomy for delicious brings up the taxonomy Flavorful because a synonym is defined in the taxonomy value properties.
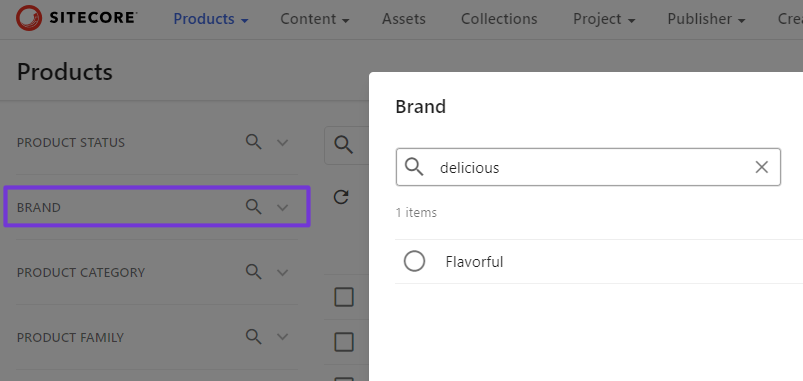
Synonyms are also useful when you want to account for regional spelling variants (for example, Flavourful).
To apply the changes you make to taxonomy values, clear the datasource cache.
To add values to a taxonomy:
-
On the menu bar, click Manage .
-
On the Manage page, click Taxonomy.
-
On the Taxonomy page, click the taxonomy you want to modify to open its details page.
-
On the Taxonomy Management page, click Add .
NoteTo create child taxonomy values, click an existing taxonomy value and then click Add .
-
In the right-hand pane, fill in the following fields. The fields vary according to the taxonomy type.
Field Description Identifier A unique user or system-generated identifier. Name The taxonomy name displayed in the UI. Label The label displayed in the UI. Sort index The integer value used to manually sort taxonomy terms. For example, a term with a value of 1 will be displayed before the term with a value of 2. Synonyms The synonyms that can be used when searching a category. Description The description displayed, for example, in a super facet. Triggers Vision Performs an image analysis on the asset automatically. Triggers extract archives Automatically extracts and displays the list of files contained in a composite asset. Triggers video AI Performs a video AI anlaysis on the asset automatically. -
In the Publishing section, turn on the Don't publish to delivery platform switch to change the default setting.
-
In the Visualization section, click the icon and select a new one.
-
From the Color list, select the icon color.
-
Click Save.
-
Repeat steps 4 through 9 to add as many taxonomy values as you want.
Master is a reserved internal label. Do not use it as the taxonomy identifier. For example, using Creation.Master or CMP.Creation.Master results in an error. You can, however, use it in combinations such as CreationType.Master or MasterDM.Creation.