OneDrive setup
You can enable OneDrive integration for OneDrive for Business and OneDrive personal.
You can perform the following actions using OneDrive:
-
Check out files to OneDrive: your files are uploaded to your OneDrive, and the assets will be locked in Sitecore Content Hub™.
-
Check in files from OneDrive: your checked out file is fetched from your OneDrive, and the asset in Content Hub is updated with the new file.
-
Discard checked out files: your file is removed from your OneDrive, and the asset in Content Hub will be unlocked.
-
Download to OneDrive: your file is uploaded from Content Hub to your OneDrive, but the file is not tracked, so the assets remain unlocked.
Setup
You need to create an app registration, choosing from:
-
OneDrive Personal: https://apps.dev.microsoft.com/portal/register-app.
-
OneDrive for Business: https://portal.azure.com (see Setup OneDrive for Business for more details).
Set up OneDrive settings
-
Checkouts folder (checkoutsFolder) and Downloads folder (downloadsFolder): These folders can be used to separate checked out and downloaded files. If left empty, the files are uploaded to the root app folder.
-
logLevel: In Content Hub, a job is created for each action. If loglevel is set to Error or left empty, a job target is created for failed files only. If loglevel is set to Info, a job target is created for each file.
-
enabled: This setting needs to be set to true to enable OneDrive integration or set to false to disable it.
-
clientId and clientSecret: The personal codes the user receives from their app registration.
-
authorizeUri and tokenUri: These settings must be set to the user's specific URI for OneDrive for Business. For OneDrive personal, the default values are ok.
In version 3.4.0 of Content Hub, the CloudDrive integration setting is system-owned; superusers cannot edit it. The setting is no longer system-owned starting from version 3.4.1.
Set up OneDrive for Business
The following steps will show you how to integrate OneDrive for Business:
-
Navigate to the Azure portal: https://portal.azure.com.
 Important
Azure Active Directory (Azure AD) is Microsoft's cloud-based identity and access management service, which helps your employees sign in and access resources. However, Microsoft plans to fully deprecate this service by June 2022, and we recommend that you migrate to Microsoft Graph APIs for your applications.
-
Using the top search bar, search for and select Azure Active Directory:

-
On the Azure Active Directory page, under Manage, select App registrations:

-
On the top menu of the App registration page, select the + New registration option:

-
When the Register an application page appears, enter your application's registration information:
-
Name: Enter a meaningful application name that is displayed to users of the app.
-
Supported account types: Select which accounts you would like your application to support:
-
Accounts in this organizational directory only: Select this option if you create a line-of-business (LOB) application.
-
Accounts in any organizational directory: Select this option if you want to target all business and educational customers.
-
Accounts in any organizational directory and personal Microsoft accounts: Select this option to target the broadest set of customers.
-
-
-
Redirect URI (optional): The redirect URI is the URL where you will be redirected after successfully logging into OneDrive. Select either Web or SPA - Single Page Application. In this example, Web is selected. As you are logging into OneDrive for Business from your user profile using Connect OneDrive for Business, the redirect URI should include the profile name as well, e.g.,
https://<your_sitecore_content_hub_instance>/en-us/user/myprofile. To find the required address, click your avatar and select Profile from the menu. This page is the correct Redirect URI that can be used in the registration of a new application or replyUrlsWithType attribute when completing the Manifest later:
In this example,
https://stylelabs.io/en-us/user/myprofileis used:
-
After entering the required details, click on Register:

-
Azure AD assigns a unique Application (client) ID to your app, and you automatically move to the Overview page of your application:

The Application (client) ID value is required for the clientId field in the OneDrive integration settings in Content Hub:

-
Generate a client secret by selecting the Certificates & secrets option under the Manage menu:

-
On the Certificates & secrets page, click + New client secret:

-
On the Add a client secret modal, provide a Description for the client secret in the text box, and select an expiration date (expires) from the options:
-
in 1 year
-
in 2 years
-
Never
Click on Add to continue:

-
-
Your application's credentials are updated and the value of the secret is displayed with a copy option. You need to copy and save this value in another location, as you cannot retrieve it later:

The Client secret is the required value for the clientSecret field in the OneDrive integration settings in Content Hub:

-
Under Manage, select the Manifest option:

A web-based manifest editor opens, which allows you to edit the Manifest within the portal. Optionally, you can select Download to edit the Manifest locally, and then use Upload to reapply to your application:

-
If you did not add the Redirect URI when creating your application, search for the replyUrlsWithType key in the JSON file and enter the value of
https://<your_sitecore_content_hub_instance>/en-us/user/myprofile. The replyUrlsWithType attribute holds the list of registered redirect_uri values that Azure AD will accept as destinations when returning tokens. Each URI value should contain an associated app type value. The supported type values are:-
Web
-
InstalledClient
In this example, the supported type value Web is selected as the type value:
NoteFor more information on the Azure Active Directory app manifest, please see Azure Active Directory app manifest.
-
-
Once you have finished editing the Manifest, click on Save:

-
Return to the Overview page by selecting the Overview option from the menu on the Manifest page:

-
On the Overview page, select the Endpoints option:

-
The Endpoints modal is displayed, showing the authentication endpoints for your tenant. Use the endpoint that matches the authentication protocol that you are using in conjunction with the Application (client) ID to craft the authentication request specific to your application. Copy the OAuth 2.0 authorization endpoint (v1) and OAuth 2.0 token endpoint (v1). You can copy an endpoint to the clipboard by clicking the
 icon, which is shown at the end of each endpoint:
-
Copy the OAuth 2.0 authorization endpoint (v1) to the clipboard:

The OAuth 2.0 authorization endpoint (v1) value is required for the authorizeUri field in the OneDrive integration settings in Content Hub:

-
Copy the OAuth 2.0 token endpoint (v1) to the clipboard:

The OAuth 2.0 token endpoint (v1) value is required for the tokenUri field in the OneDrive integration settings in Content Hub:

-
Once both the authorizeUri and the tokenUri have been completed with he OAuth 2.0 token endpoint (v1)and the OAuth 2.0 token endpoint (v1), click on Save.
-
Returning to the Overview of the App registration, click on "API permissions" in the left-hand menu to add new permissions:

-
To add a permission, click on + Add a permission:

-
On the Request API permissions modal, scroll down the Commonly used Microsoft APIs and select Azure Active Directory Graph under Supported legacy APIs:

-
Select the Delegated permissions. Delegated permissions allow an application in Azure Active Directory to perform actions on behalf of a particular user:

-
On the Delegated permissions section, click on expand all to display all the permissions:

-
The required Delegated permissions for Azure Active Directory Graph you need are:
-
Directory.AccessAsUser.All - Access the directory as the signed-in user: Allows the app to have the same access to information in the directory as the signed-in user.
-
User.Read - Sign in and read user profile: Allows users to sign in to the app, and allows the app to read the profile of signed-in users. It also allows the app to read basic company information of signed-in users.

-
-
Click Add permissions to save the permissions and automatically return to the API permissions page, which displays the current saved permissions:

-
Next, you need to add permissions for SharePoint. Click the + Add a permission button. On the Microsoft APIs tab, scroll down and select the SharePoint option:

-
Select the Delegated permissions option. The Request API permissions you require for SharePoint permissions are:
-
MyFiles.Read - Read user files: Allows the app to read the current user's files.
-
MyFiles.Write - Read and write user files: Allows the app to read, create, update, and delete the current user's files.
-
Sites.Search.All - Run search queries as a user: Allows the app to run search queries and to read basic site info on behalf of the currently signed-in user. Search results are based on the user's permissions instead of the app's permissions.
-
TermStore.ReadWrite.All - Read and write managed metadata: Allows the app to read, create, update, and delete managed metadata and to read basic site info on behalf of the signed-in user.
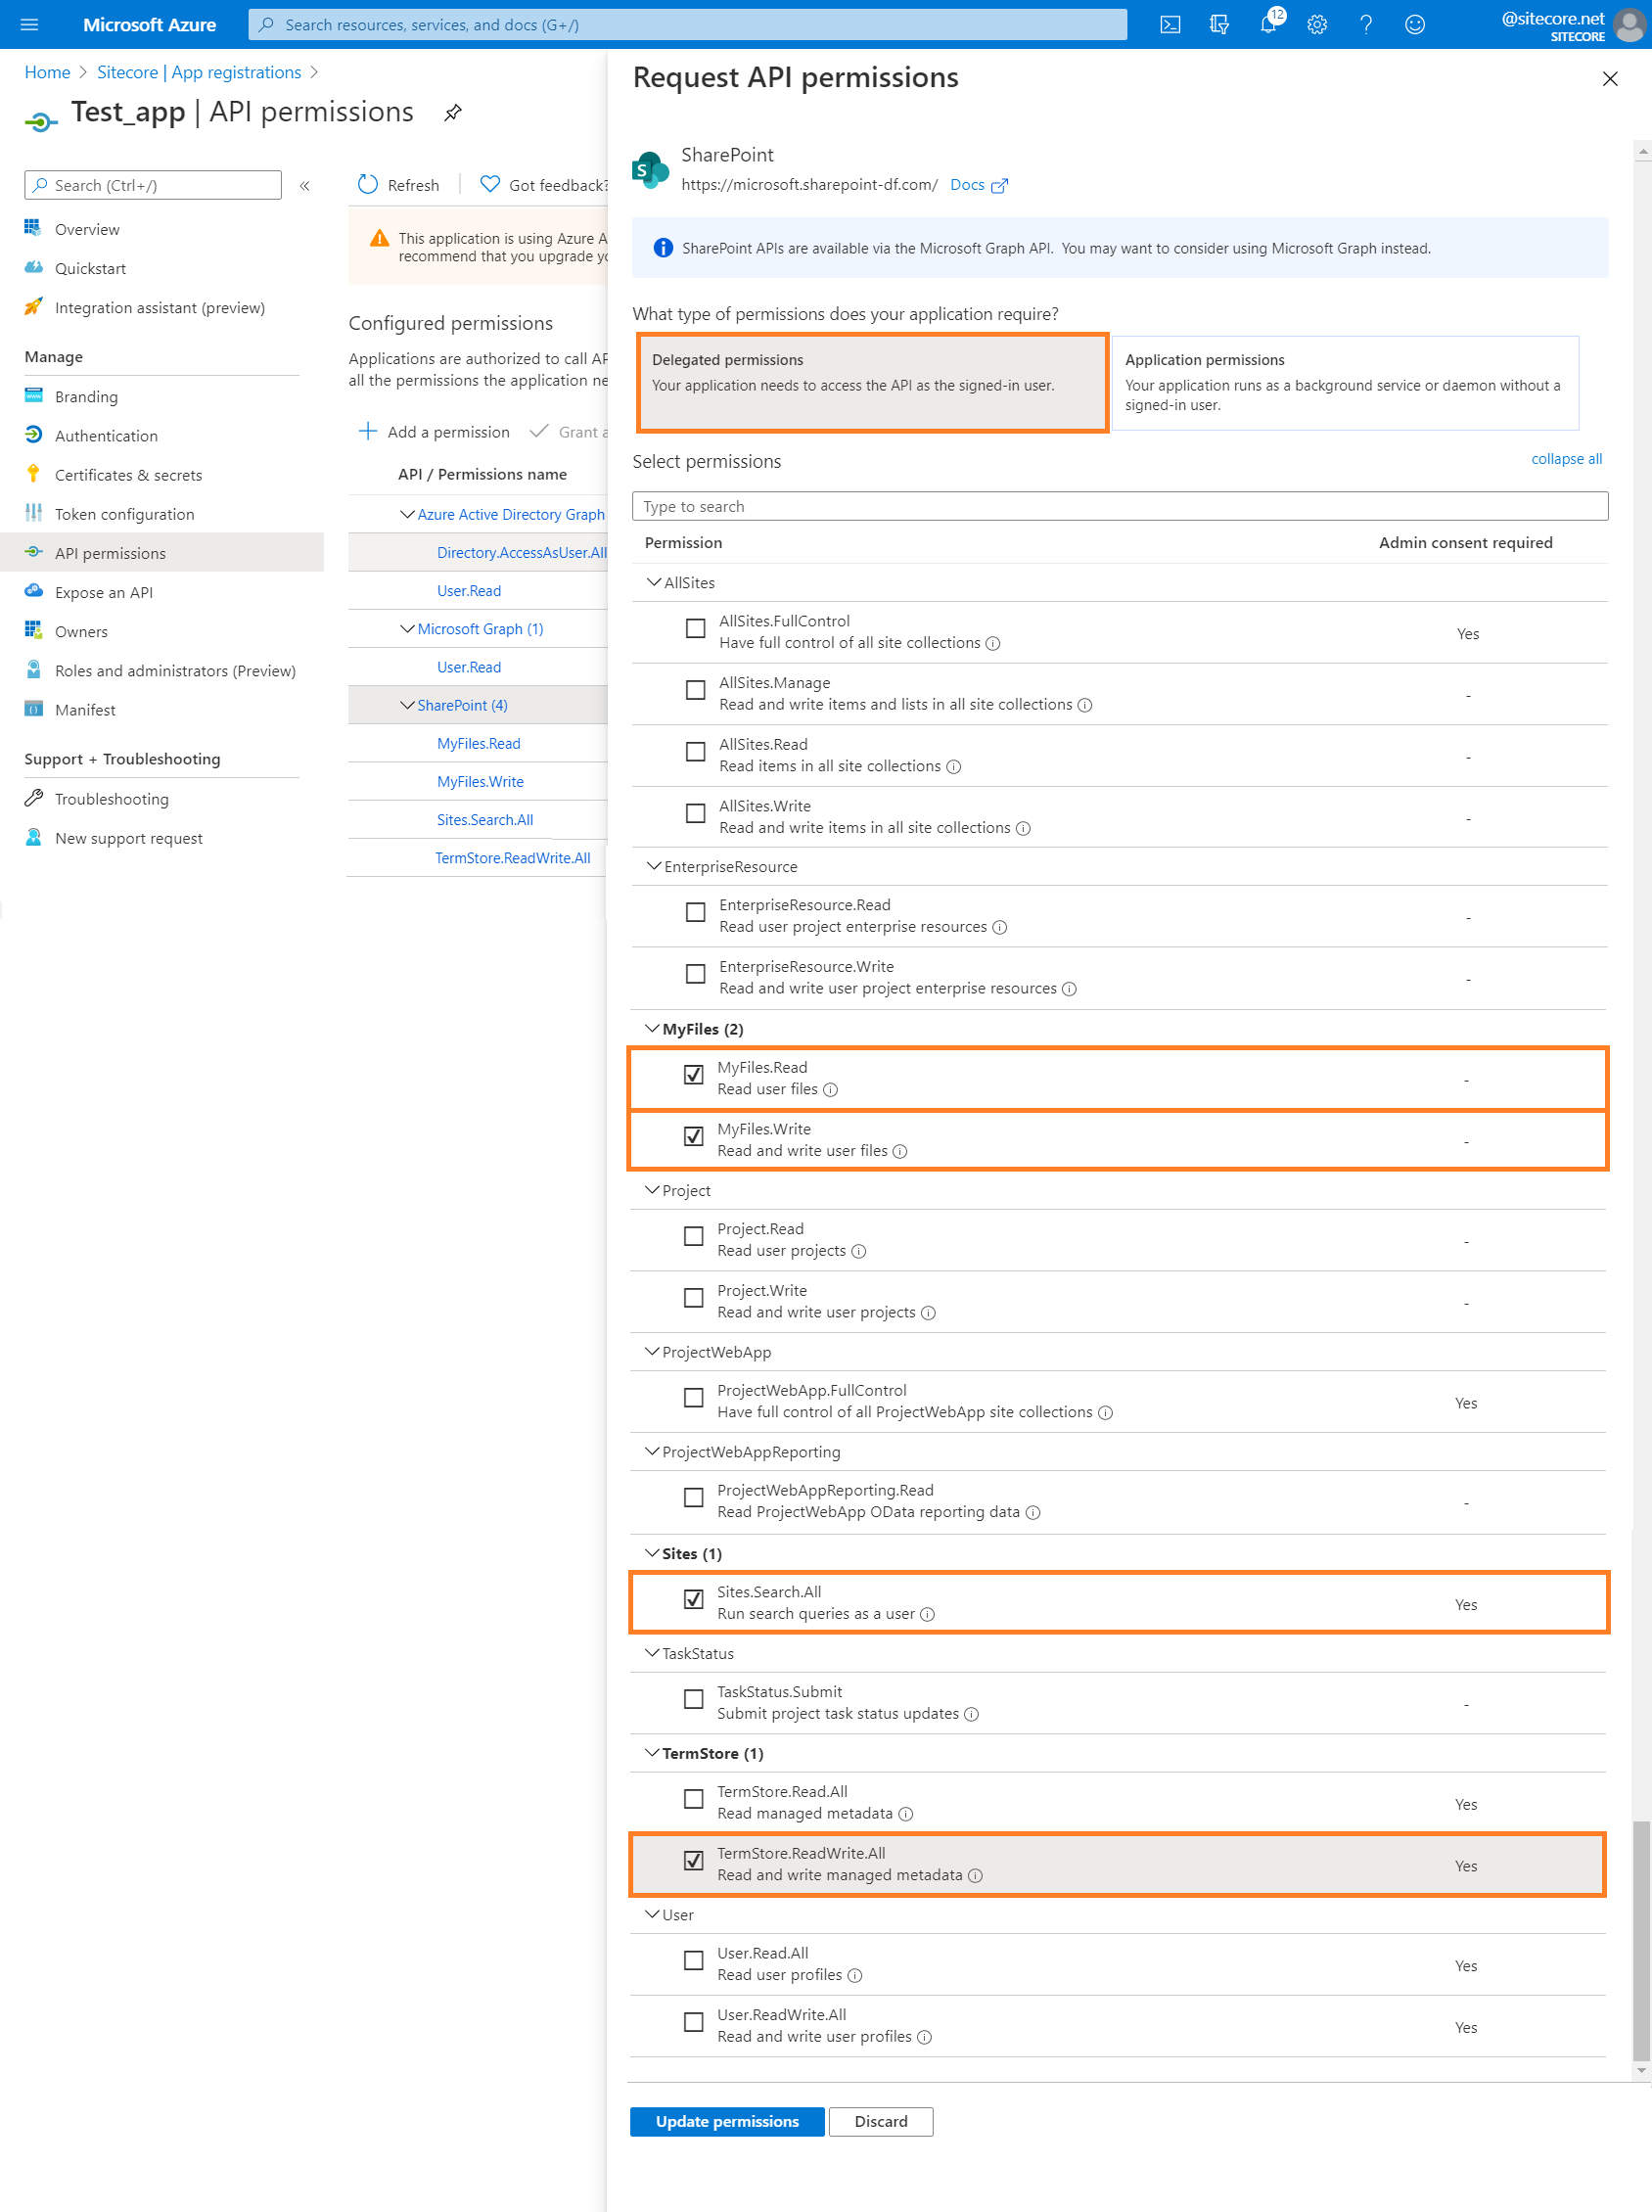 Once you have selected these permissions, click the Update permissions button. The permissions are included:
 Warning
Sites.Search.All and TermStore.ReadWrite.All require administrative consent.
If you do not have the Admin consent required, you will see the following error when connecting Content Hub:

It is therefore advisable that you check with your IT support that you have the Admin consent required and that you have a Granted status for each API/ Permission:

-